> ## Documentation Index
> Fetch the complete documentation index at: https://docs.xray.cool/llms.txt
> Use this file to discover all available pages before exploring further.
# 快速开始
xapp 为单文件二进制文件,无依赖,也无需安装,下载后直接使用。
请注意,xapp为命令行工具,请不要双击运行,需要在命令行中运行。且xapp本身并不携带任何插件,如果需要插件,请前往指纹仓库下载。
## 下载地址
### release 下载
请下载的时候选择最新的版本下载。
* Github: [https://github.com/chaitin/xray/releases?q=xapp](https://github.com/chaitin/xray/releases?q=xapp) (国外速度快)
* CT stack: [https://stack.chaitin.com/tool/detail/1311](https://stack.chaitin.com/tool/detail/1311) (国内速度快)
xapp 跨平台支持,请下载时选择需要的版本下载。
### 指纹仓库下载
* Github: [https://github.com/chaitin/xray-plugins](https://github.com/chaitin/xray-plugins)
下载好之后,可以使用-r的方式加载指定的插件,或者使用-g加载group中的插件group。
如果希望不指定指纹,直接默认全都加载,可以将希望全都加载的插件放到\~/.xray/xapp/plugins目录下。
## 扫描
 需要注意的是,xapp只扫描http和https协议,所以填写目标时请务必加上协议。
### 加载方式
1. 运行时指定运行部分指纹
直接在命令行中指定-r参数,加载指定的指纹即可,具体参考下述例子
2. 运行时不指定指纹,加载\~/.xray/xapp/plugins目录下所有指纹
下载[指纹仓库](https://github.com/chaitin/xray-plugins)或者将自己编写的指纹放到该目录下,运行时不指定-r参数,xapp会自动加载该目录下所有指纹。
请将具体的文件放到这个目录下,不要将整个指纹仓库放到这个目录下
3. 运行时指定一个规则文件,加载该规则文件中的所有指纹
文件编写方式可以参考[group.list](./group)或者[运行策略组](https://github.com/chaitin/xray-plugins/tree/main/group)的内容
然后使用`-g`就可以运行
4. 将规则文件变成一个命令,运行时直接使用命令加载指纹
尝鲜功能,可能存在一些bug
```yaml xapp-config.yaml theme={null}
xapp: &xapp
concurrent: 100
workflow:
- name: scan
base:
- util-target-split
- util-get-env
- detect-url
- detect-website
- list-enable
- fingerprint
- util-reminder
output: [ "event.website" ]
- name: output
base:
- util-result-printer
input: [ "event.website" ]
strategies:
- <<: *xapp
name: l1
description: 我的自定义命令
path:
- g:///root/xray-plugins/group/test.list
```
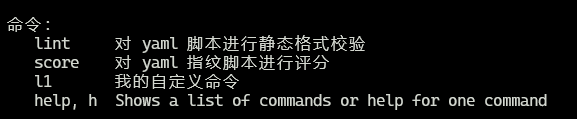
请将上述内容复制到xapp-config.yaml文件中,然后运行,即可在help中看到自定义的命令:
需要注意的是,xapp只扫描http和https协议,所以填写目标时请务必加上协议。
### 加载方式
1. 运行时指定运行部分指纹
直接在命令行中指定-r参数,加载指定的指纹即可,具体参考下述例子
2. 运行时不指定指纹,加载\~/.xray/xapp/plugins目录下所有指纹
下载[指纹仓库](https://github.com/chaitin/xray-plugins)或者将自己编写的指纹放到该目录下,运行时不指定-r参数,xapp会自动加载该目录下所有指纹。
请将具体的文件放到这个目录下,不要将整个指纹仓库放到这个目录下
3. 运行时指定一个规则文件,加载该规则文件中的所有指纹
文件编写方式可以参考[group.list](./group)或者[运行策略组](https://github.com/chaitin/xray-plugins/tree/main/group)的内容
然后使用`-g`就可以运行
4. 将规则文件变成一个命令,运行时直接使用命令加载指纹
尝鲜功能,可能存在一些bug
```yaml xapp-config.yaml theme={null}
xapp: &xapp
concurrent: 100
workflow:
- name: scan
base:
- util-target-split
- util-get-env
- detect-url
- detect-website
- list-enable
- fingerprint
- util-reminder
output: [ "event.website" ]
- name: output
base:
- util-result-printer
input: [ "event.website" ]
strategies:
- <<: *xapp
name: l1
description: 我的自定义命令
path:
- g:///root/xray-plugins/group/test.list
```
请将上述内容复制到xapp-config.yaml文件中,然后运行,即可在help中看到自定义的命令:
 运行:`xapp l1 -t https://xray.cool` 将等价于运行 `xapp -g /root/xray-plugins/group/test.list -t https://xray.cool`
### 扫描方式
1. 指定指纹扫描单个目标:
```bash theme={null}
xapp -r xxx.yml -t https://www.example.com
echo https://www.example.com | xapp -r xxx.yml
```
2. 指定指纹扫描多个目标:
```bash theme={null}
xapp -r xxx.yml -t https://www.example.com -t https://www.example2.com
xapp -r xxx.yml -i targets.txt
cat targets.txt | xapp -r xxx.yml
```
3. 指定多个指纹进行扫描:
```bash theme={null}
xapp -r xxx.yml -r yyy.yml -t https://www.example.com
xapp -r "./finger/web/*.yml" -t https://www.example.com
xapp -r "./finger/**/*.yml" -t https://www.example.com
```
4. 指定group进行扫描:
```bash theme={null}
xapp -g web.list -t https://www.example.com
```
运行:`xapp l1 -t https://xray.cool` 将等价于运行 `xapp -g /root/xray-plugins/group/test.list -t https://xray.cool`
### 扫描方式
1. 指定指纹扫描单个目标:
```bash theme={null}
xapp -r xxx.yml -t https://www.example.com
echo https://www.example.com | xapp -r xxx.yml
```
2. 指定指纹扫描多个目标:
```bash theme={null}
xapp -r xxx.yml -t https://www.example.com -t https://www.example2.com
xapp -r xxx.yml -i targets.txt
cat targets.txt | xapp -r xxx.yml
```
3. 指定多个指纹进行扫描:
```bash theme={null}
xapp -r xxx.yml -r yyy.yml -t https://www.example.com
xapp -r "./finger/web/*.yml" -t https://www.example.com
xapp -r "./finger/**/*.yml" -t https://www.example.com
```
4. 指定group进行扫描:
```bash theme={null}
xapp -g web.list -t https://www.example.com
```