> ## Documentation Index
> Fetch the complete documentation index at: https://docs.xray.cool/llms.txt
> Use this file to discover all available pages before exploring further.
# 开始扫描
> xray的扫描方式分为被动扫描、主动扫描和服务扫描
## 被动扫描(Passive scanning)
代理模式下的基本架构为,扫描器作为中间人,首先原样转发流量,并返回服务器响应给浏览器等客户端,通讯两端都认为自己直接与对方对话,同时记录该流量,然后修改参数并重新发送请求进行扫描。
### 生成证书(Generating Certificates)
在浏览器使用 https 协议通信的情况下,必须要得到客户端的信任,才能建立与客户端的通信。
这里的突破口就是 ca 证书。只要自定义的 ca 证书得到了客户端的信任,xray 就能用该 ca 证书签发各种伪造的服务器证书,从而获取到通信内容。
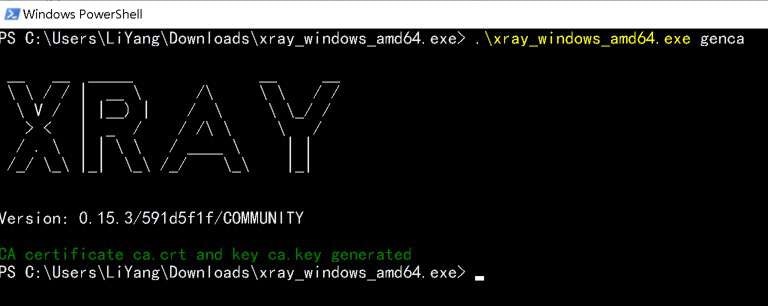 运行 `.\xray_windows_amd64.exe genca`
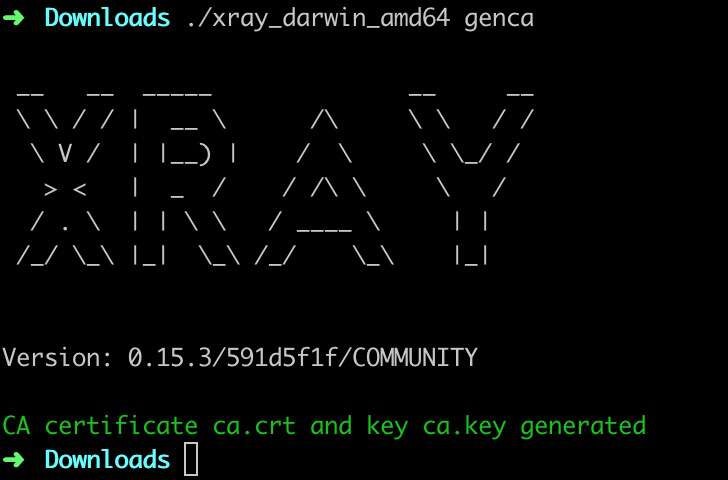 运行 `./xray_darwin_amd64 genca` 即可生成 ca 证书,保存为 `ca.crt` 和 `ca.key` 两个文件。
 运行 `./xray_darwin_amd64 genca` 即可生成 ca 证书,保存为 `ca.crt` 和 `ca.key` 两个文件。
运行命令之后,将在当前文件夹生成 `ca.crt` 和 `ca.key` 两个文件。
本命令只需要第一次使用的时候运行即可,如果文件已经存在再次运行会报错,需要先删除本地的 `ca.crt` 和 `ca.key` 文件。
### 安装证书(Installation Certificate)
如果使用的是 FireFox 浏览器,请参照[这里](https://wiki.wmtransfer.com/projects/webmoney/wiki/Installing_root_certificate_in_Mozilla_Firefox),它有自己的证书体系。
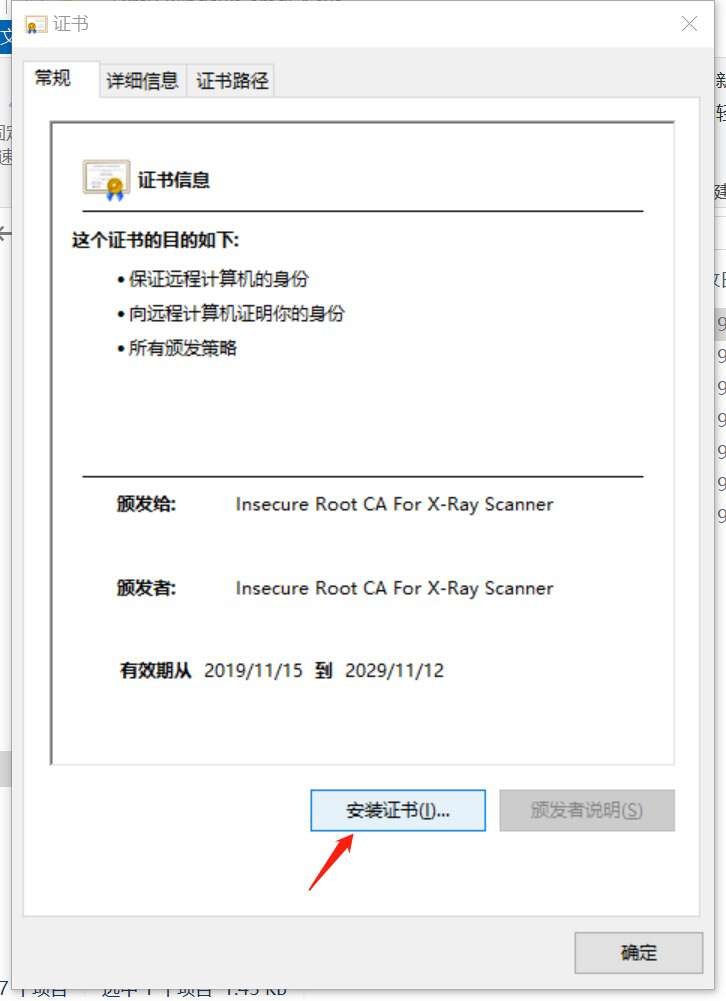
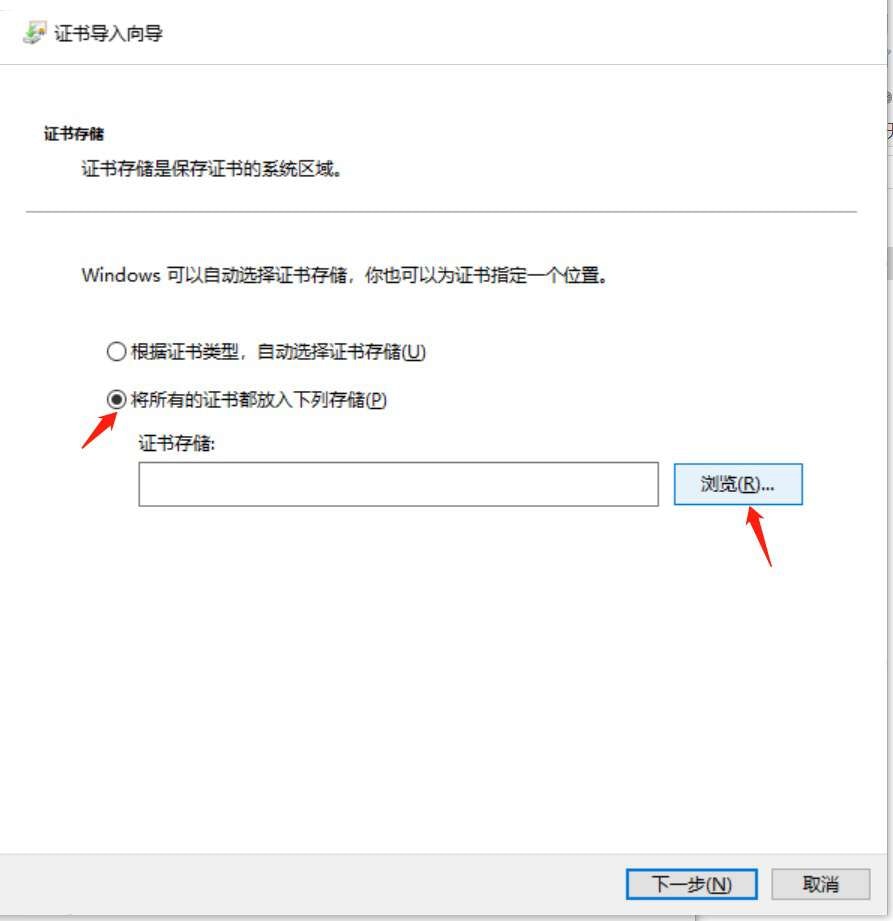
如果使用的是 IE、Chrome、curl 等客户端,建议将 ca 证书安装在操作系统上,请参照下方的教程。
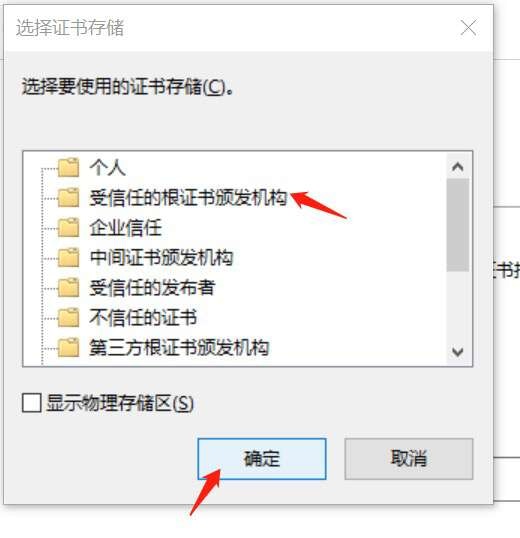
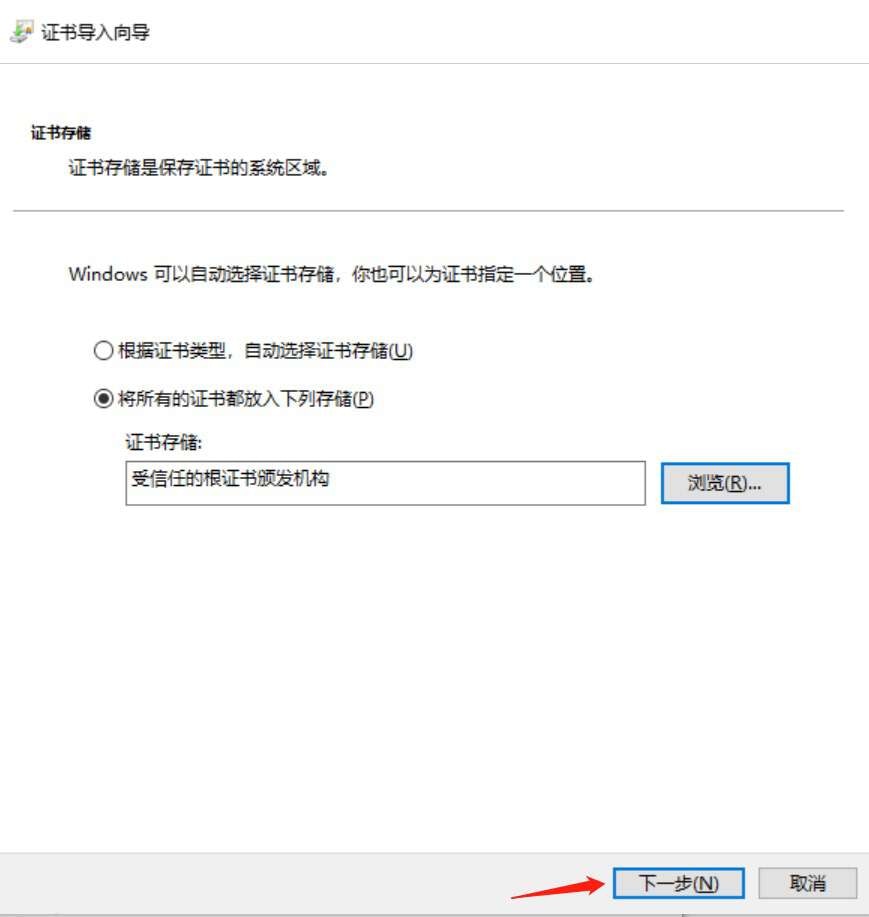
双击 `ca.crt`,然后按照下图的步骤操作。
运行 `./xray_darwin_amd64 genca` 即可生成 ca 证书,保存为 `ca.crt` 和 `ca.key` 两个文件。
运行命令之后,将在当前文件夹生成 `ca.crt` 和 `ca.key` 两个文件。
本命令只需要第一次使用的时候运行即可,如果文件已经存在再次运行会报错,需要先删除本地的 `ca.crt` 和 `ca.key` 文件。
### 安装证书(Installation Certificate)
如果使用的是 FireFox 浏览器,请参照[这里](https://wiki.wmtransfer.com/projects/webmoney/wiki/Installing_root_certificate_in_Mozilla_Firefox),它有自己的证书体系。
如果使用的是 IE、Chrome、curl 等客户端,建议将 ca 证书安装在操作系统上,请参照下方的教程。
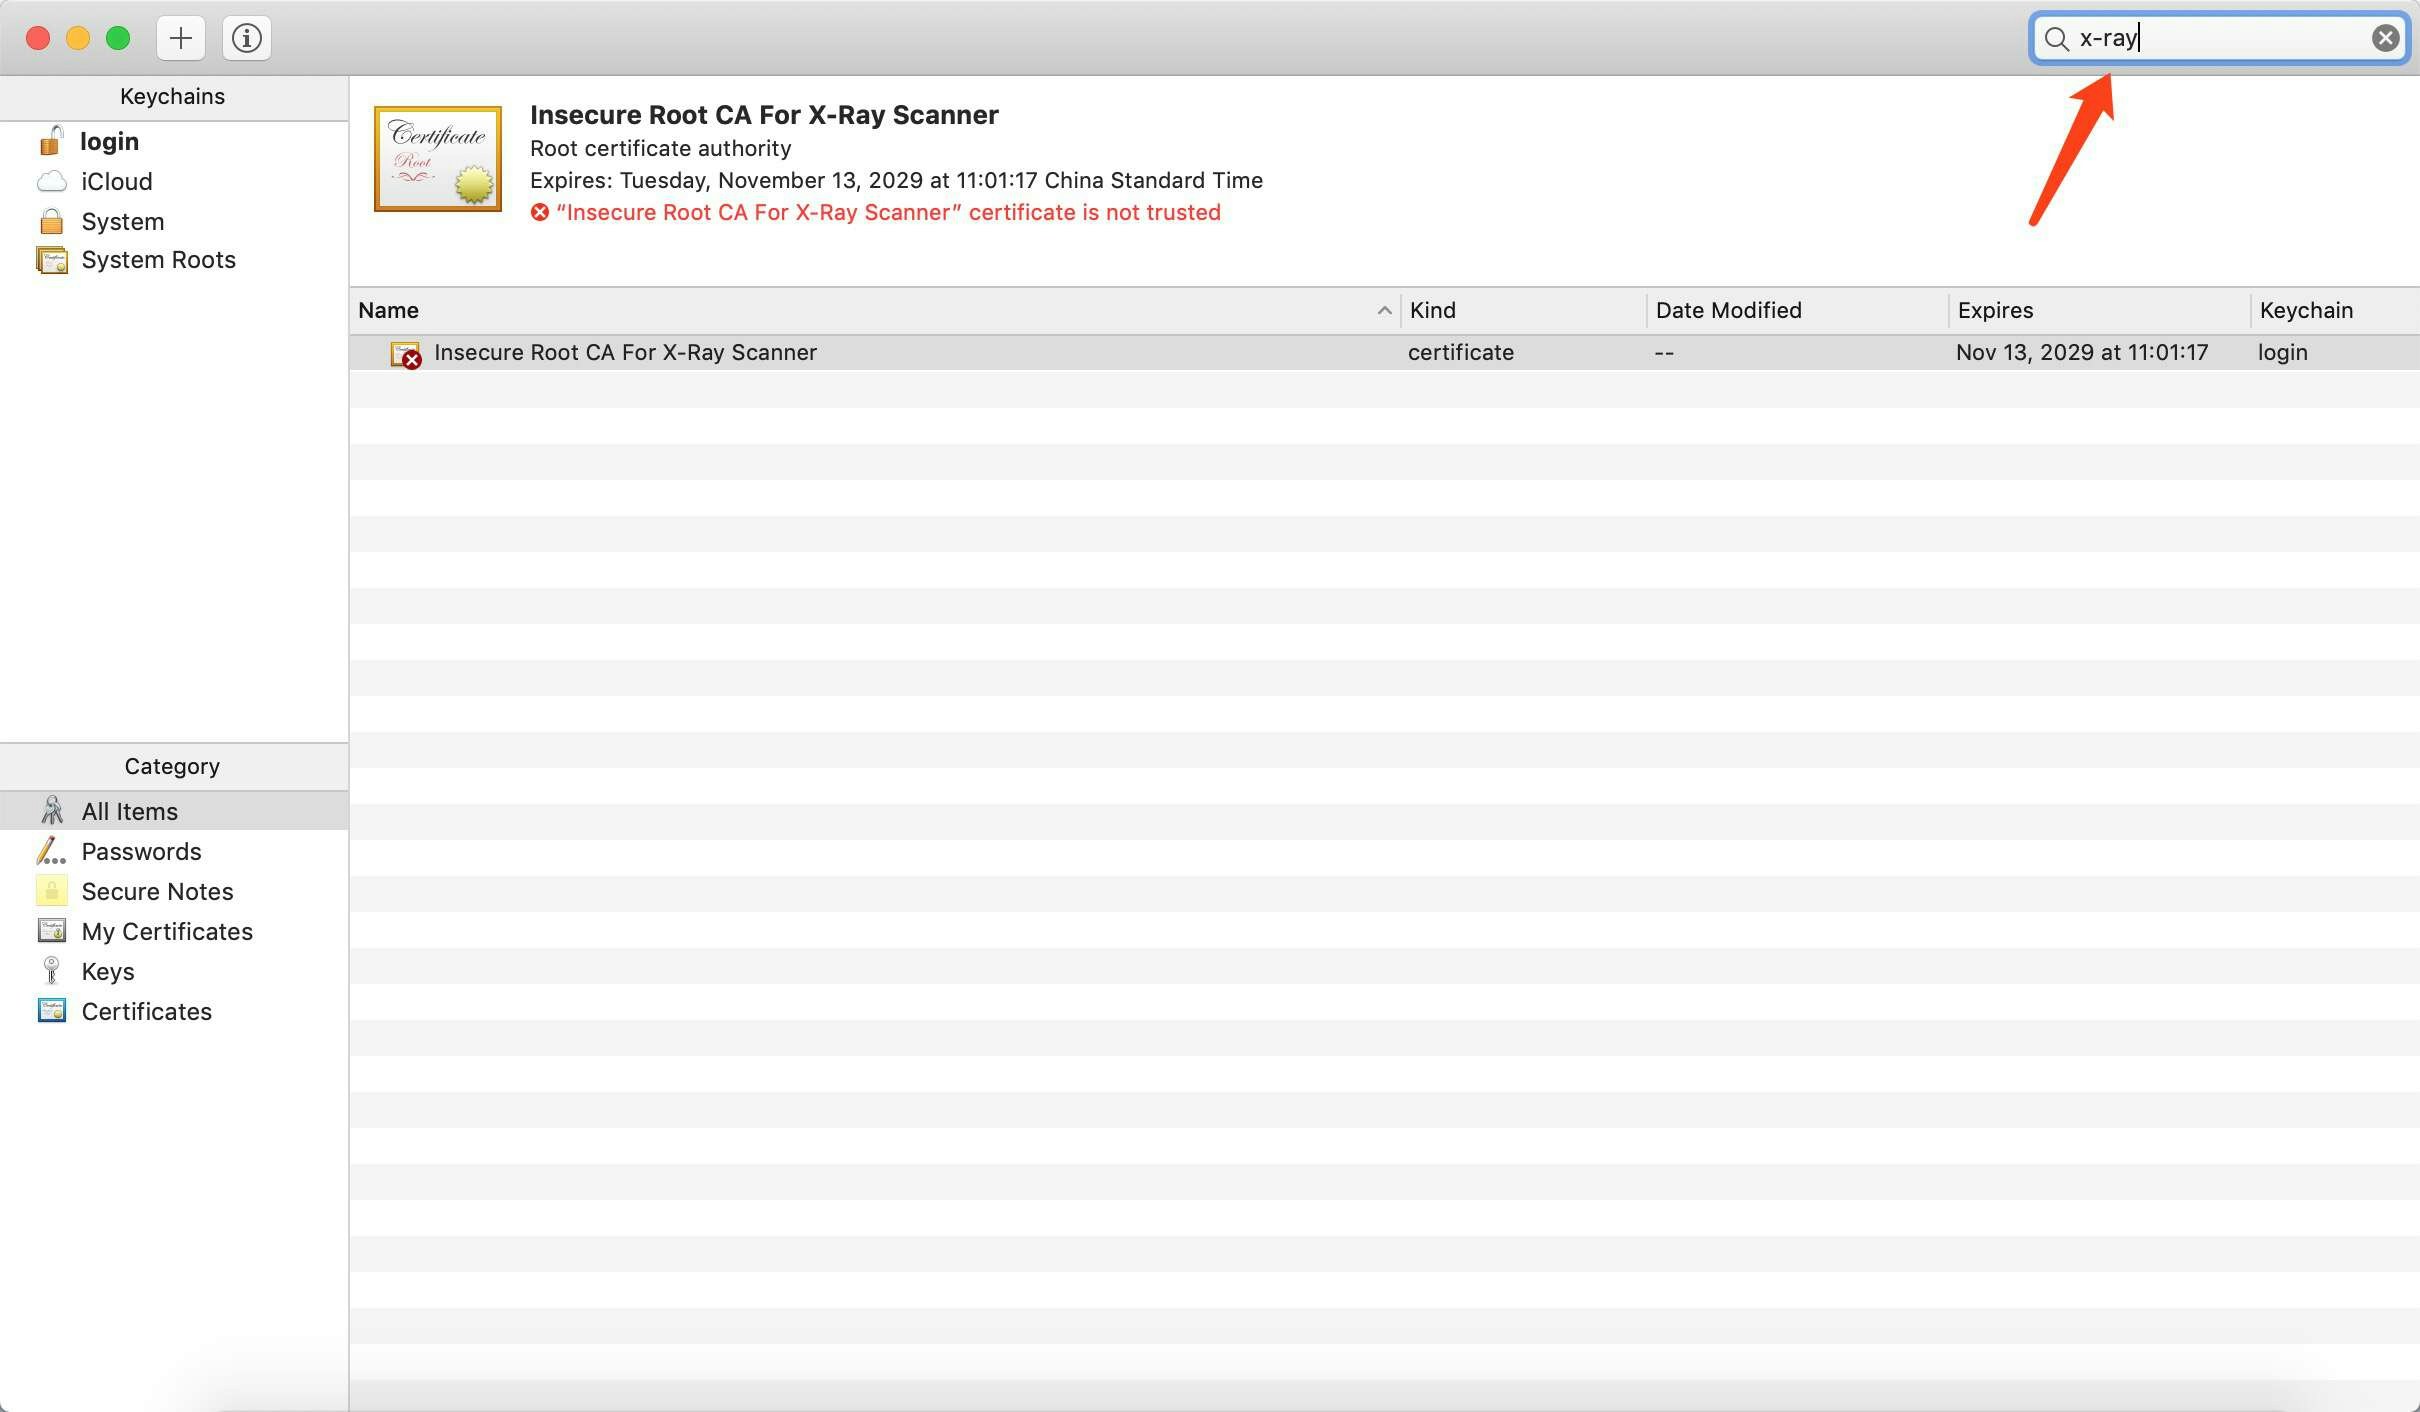
双击 `ca.crt`,然后按照下图的步骤操作。
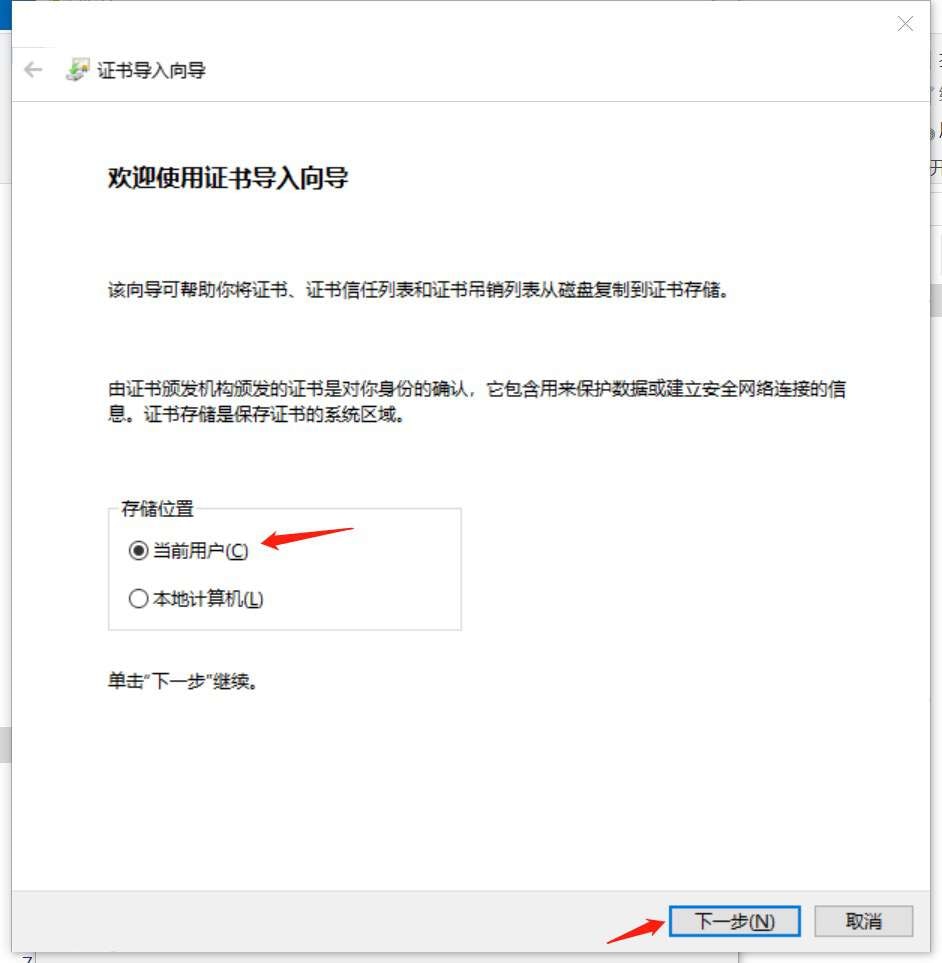

 双击 `ca.crt`,然后按照下图的步骤操作。
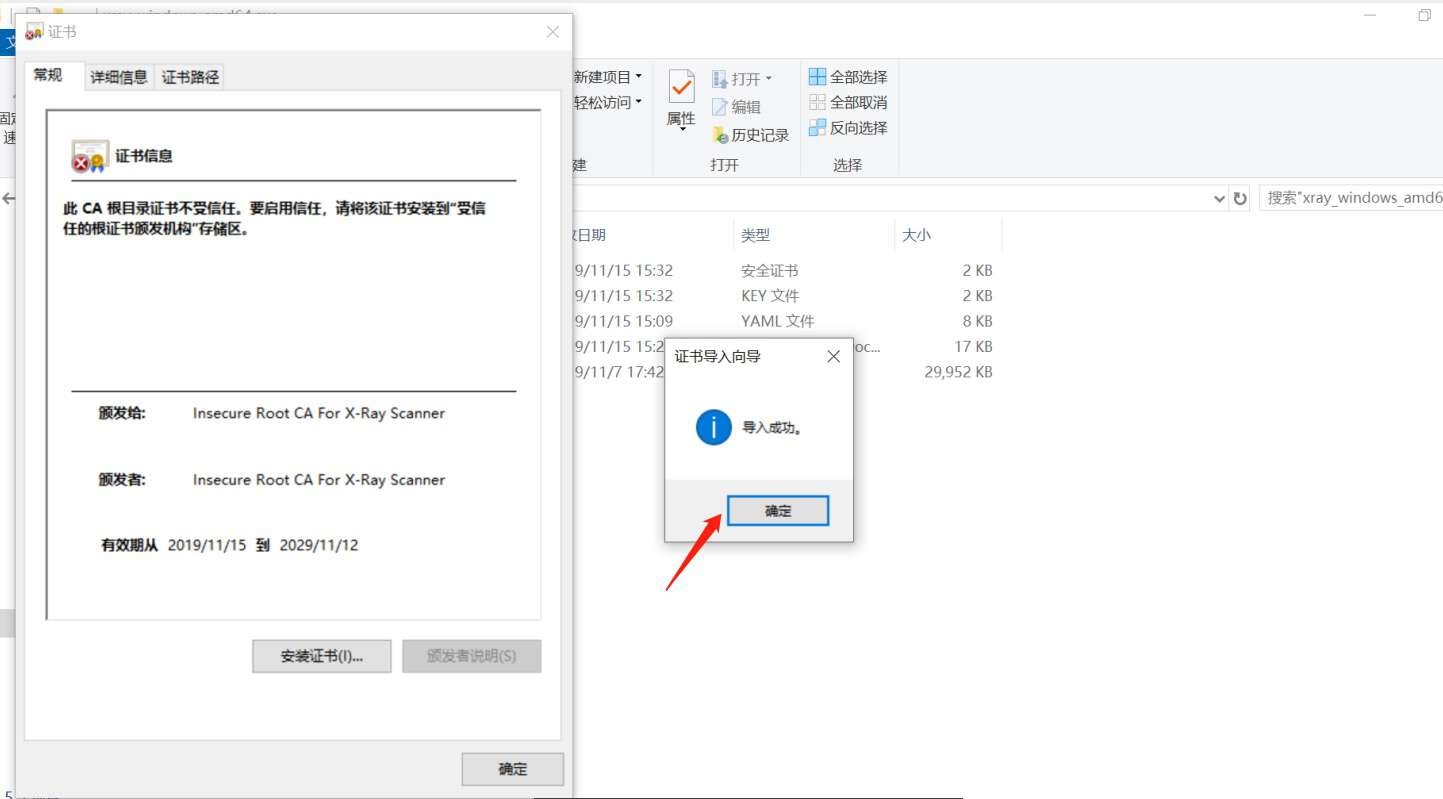
右上角搜索 `x-ray`,可以看到一条记录,有一个红叉,被标记为不受信任的。
双击 `ca.crt`,然后按照下图的步骤操作。
右上角搜索 `x-ray`,可以看到一条记录,有一个红叉,被标记为不受信任的。
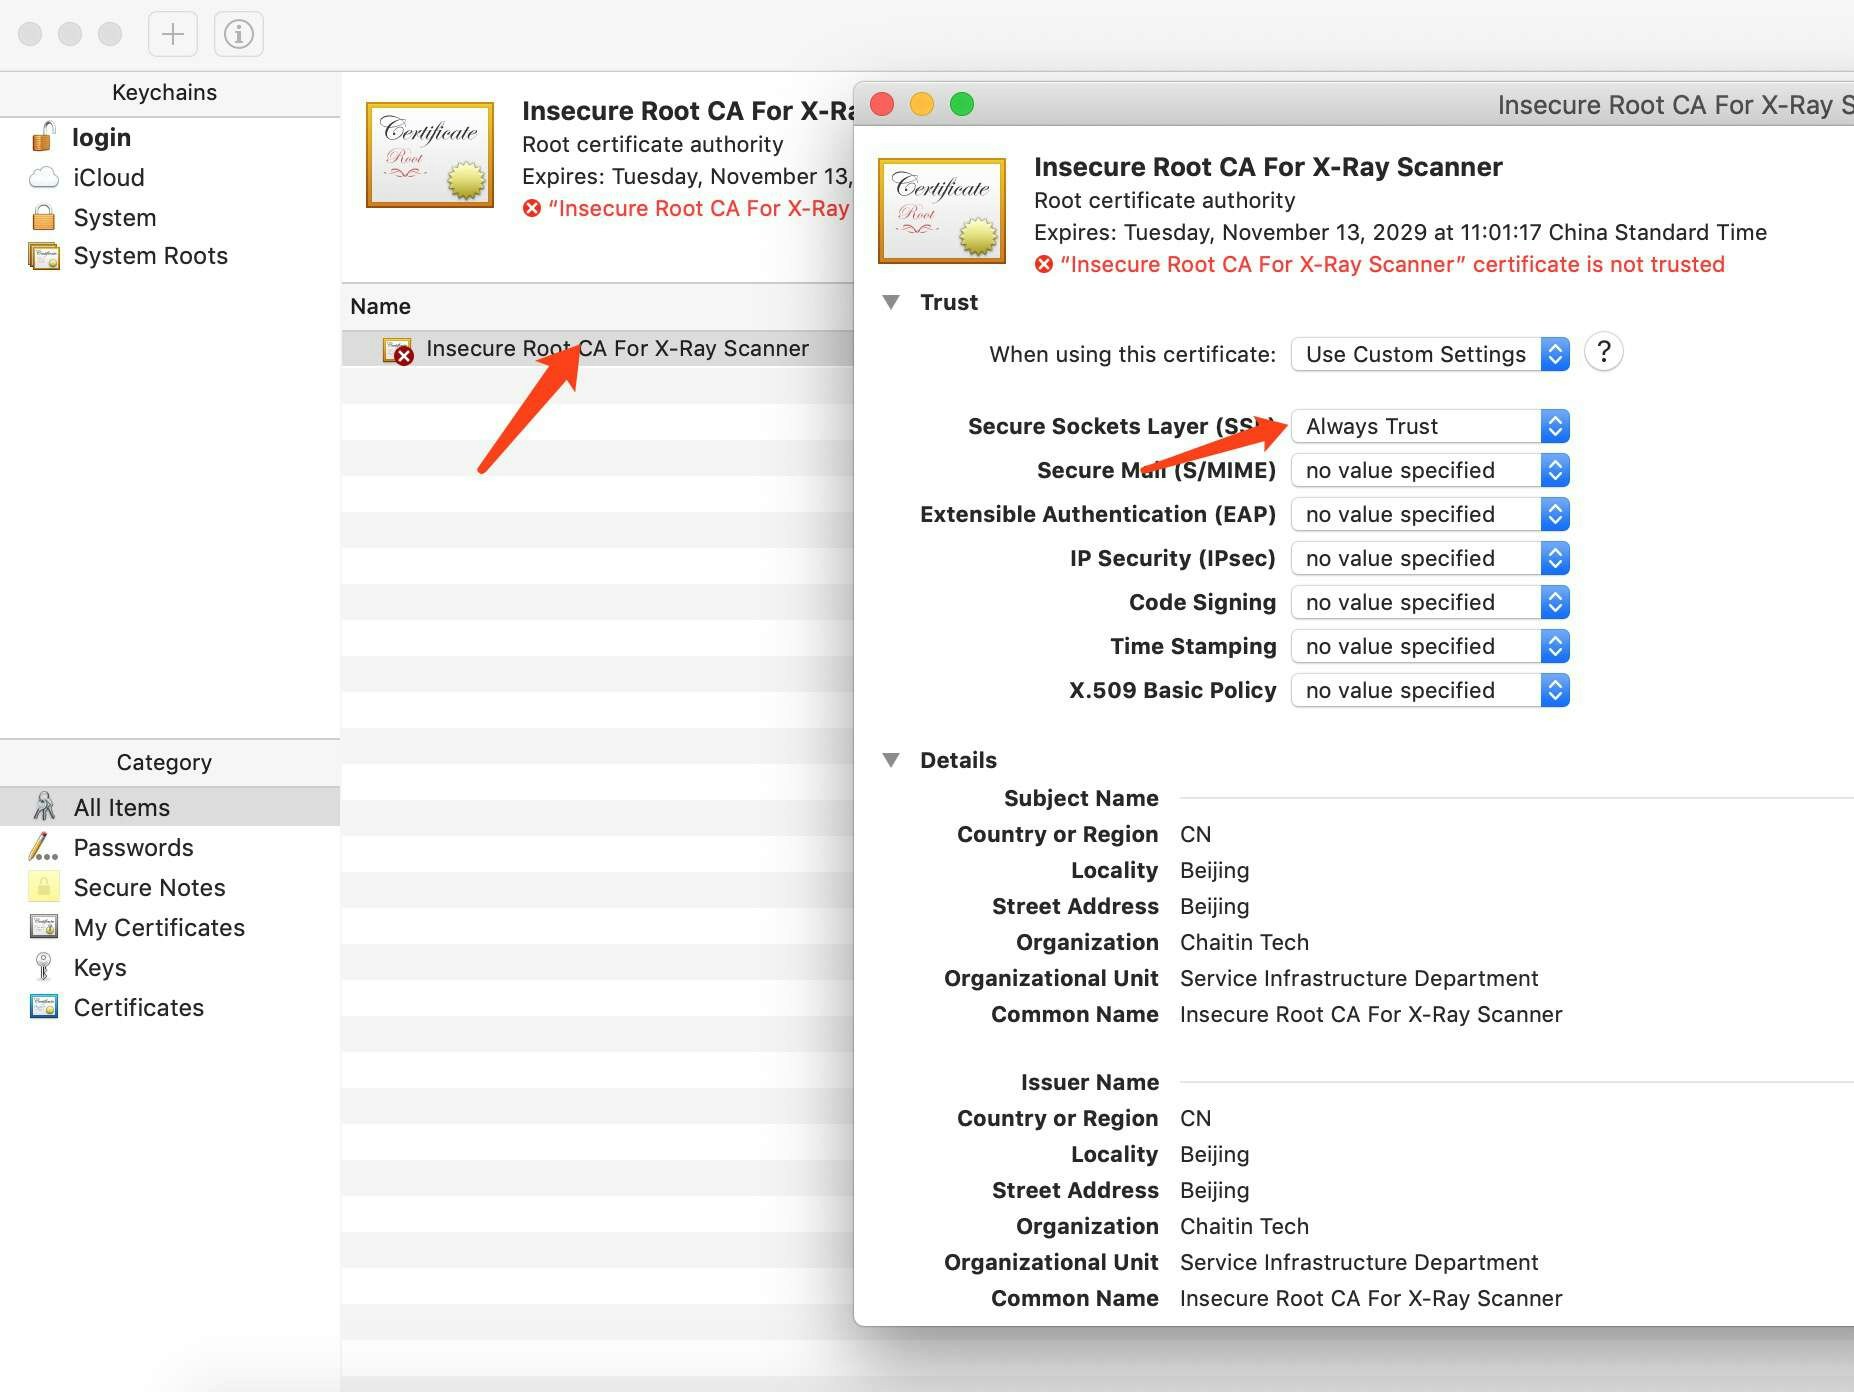
 然后双击这条记录,将 `SSL` 那一项改为始终信任,然后点击左上角关闭窗口,输入密码授权。
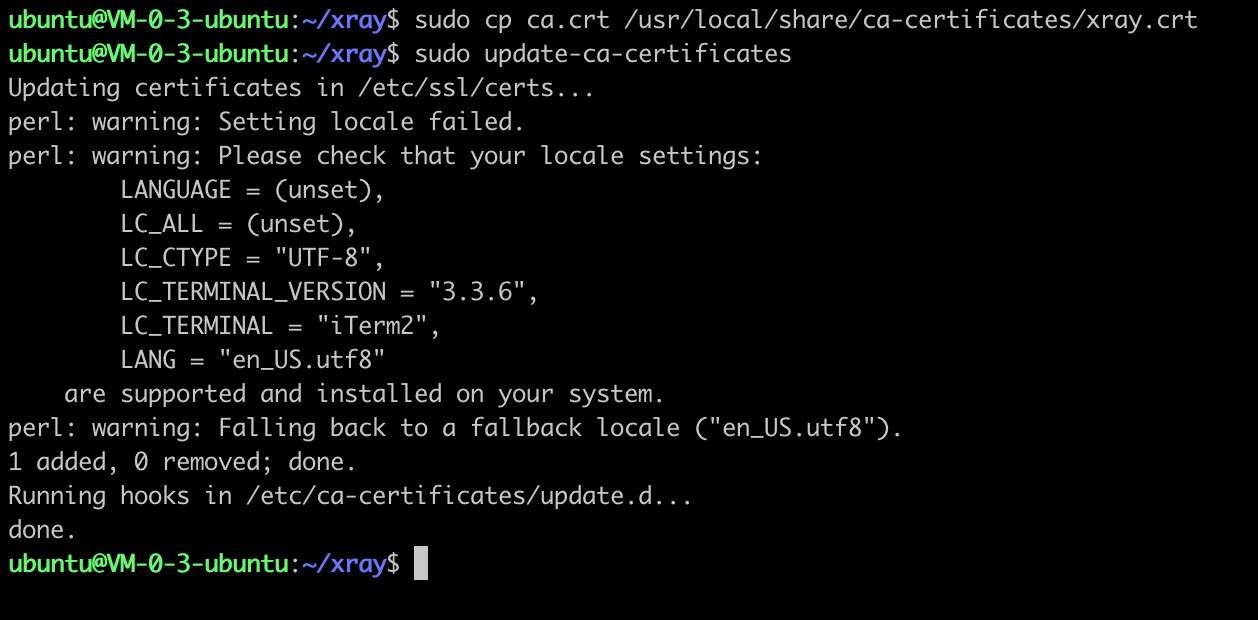
 将 `ca.crt` 复制到 `/usr/local/share/ca-certificates/`,然后执行 `update-ca-certificates`。
```
sudo cp ca.crt /usr/local/share/ca-certificates/xray.crt
sudo update-ca-certificates
```
将 `ca.crt` 复制到 `/usr/local/share/ca-certificates/`,然后执行 `update-ca-certificates`。
```
sudo cp ca.crt /usr/local/share/ca-certificates/xray.crt
sudo update-ca-certificates
```
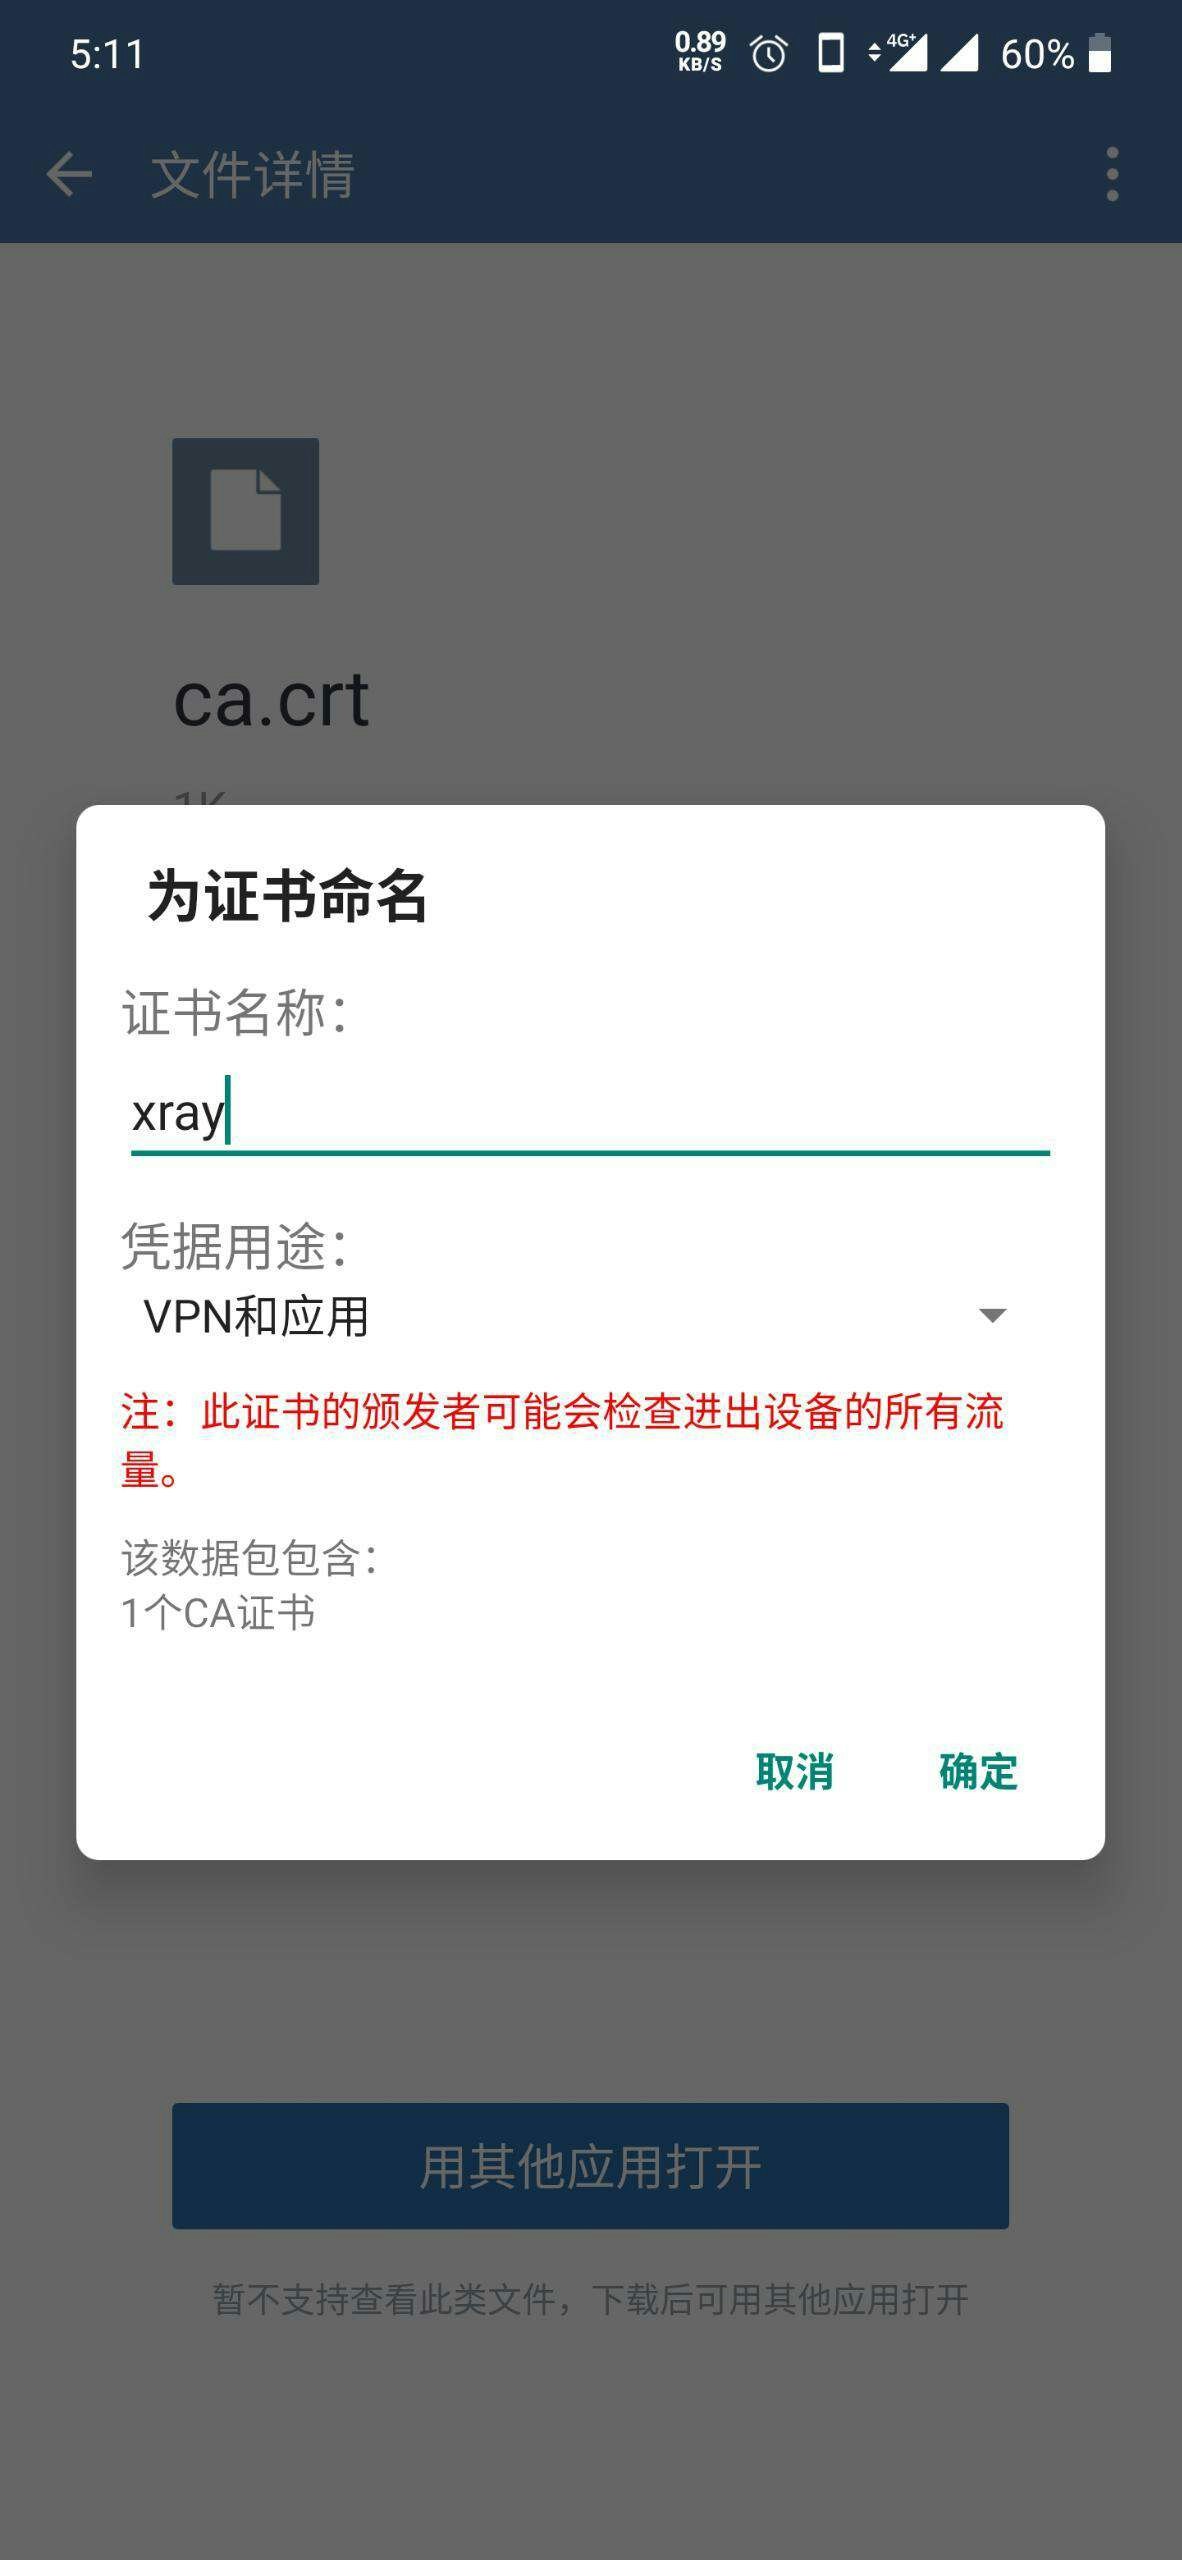
 可以将 `ca.crt` 文件传送到手机上,然后点击打开打开。
或者参考后续的步骤,将手机配置代理之后,使用浏览器访问 `http://xray/` 然后点击下载 ca 证书,然后再安装。
可以将 `ca.crt` 文件传送到手机上,然后点击打开打开。
或者参考后续的步骤,将手机配置代理之后,使用浏览器访问 `http://xray/` 然后点击下载 ca 证书,然后再安装。
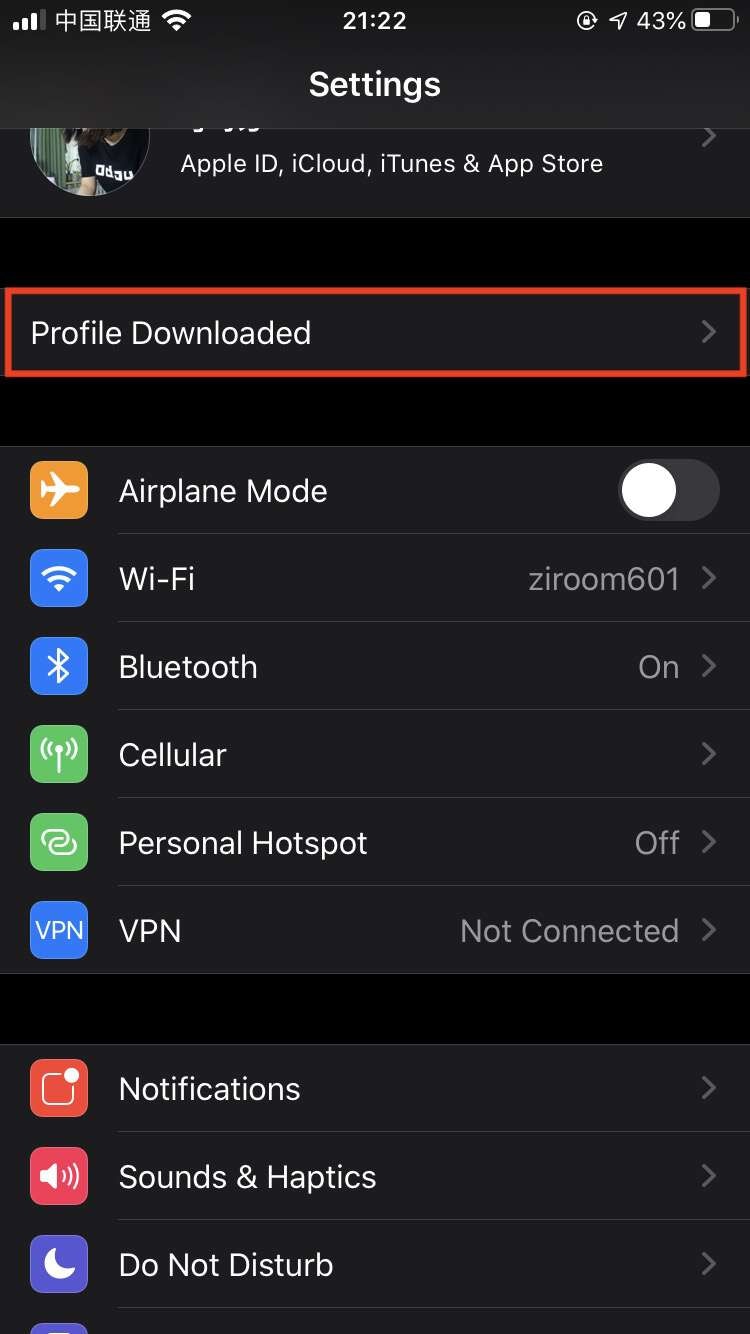
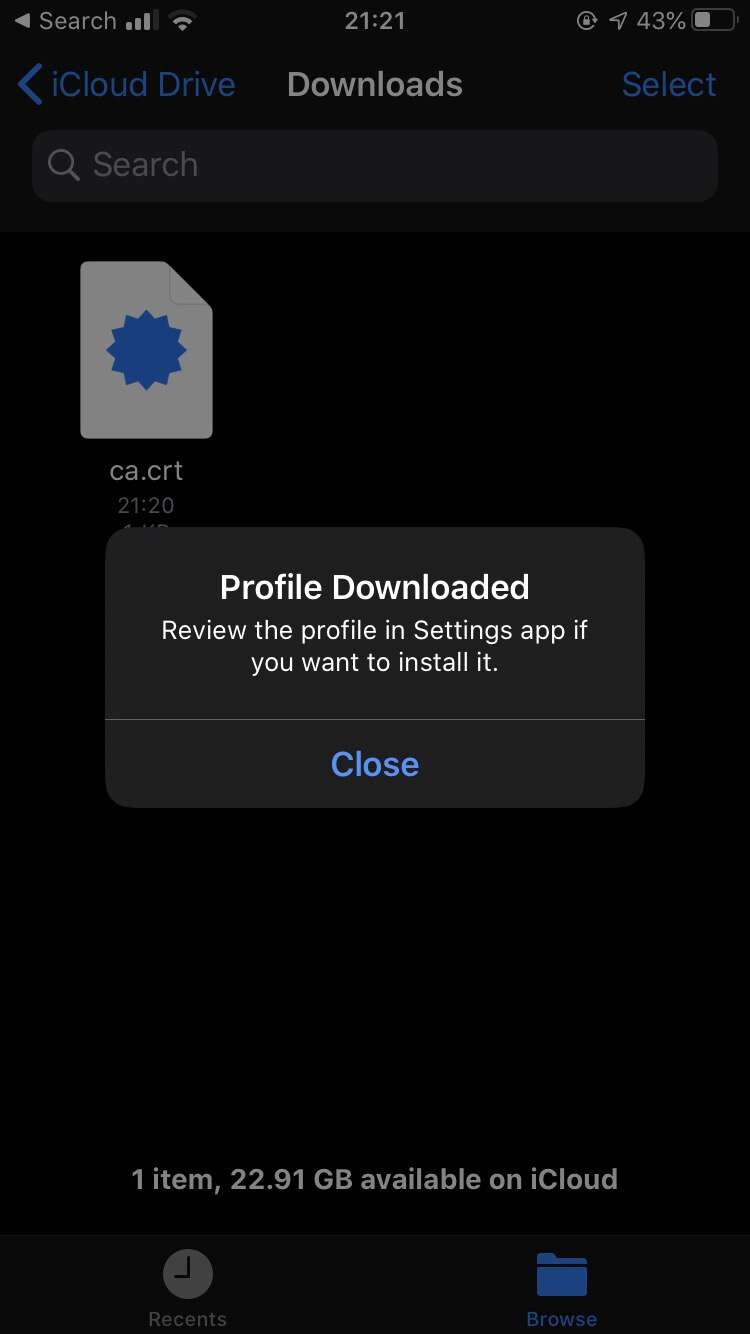 然后去设置首页,查看下载的描述文件。
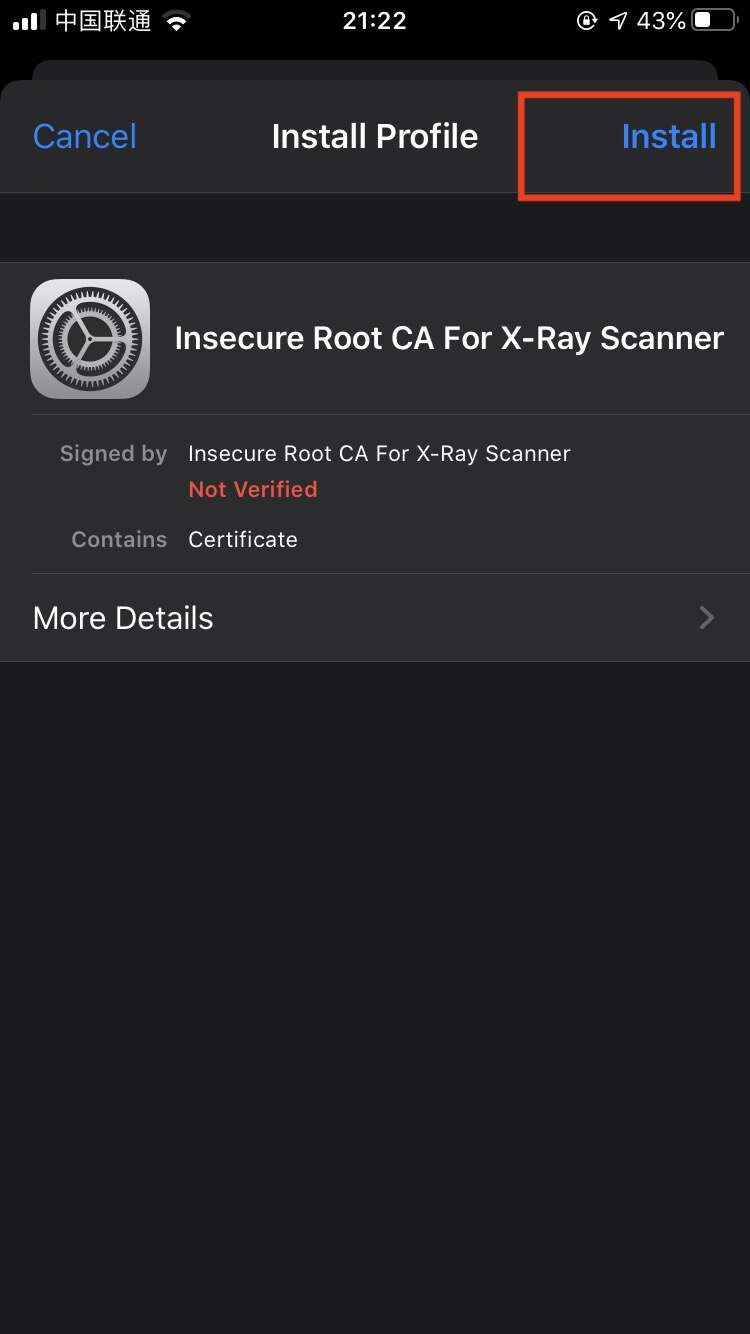
 点击右上角安装,输入密码授权。
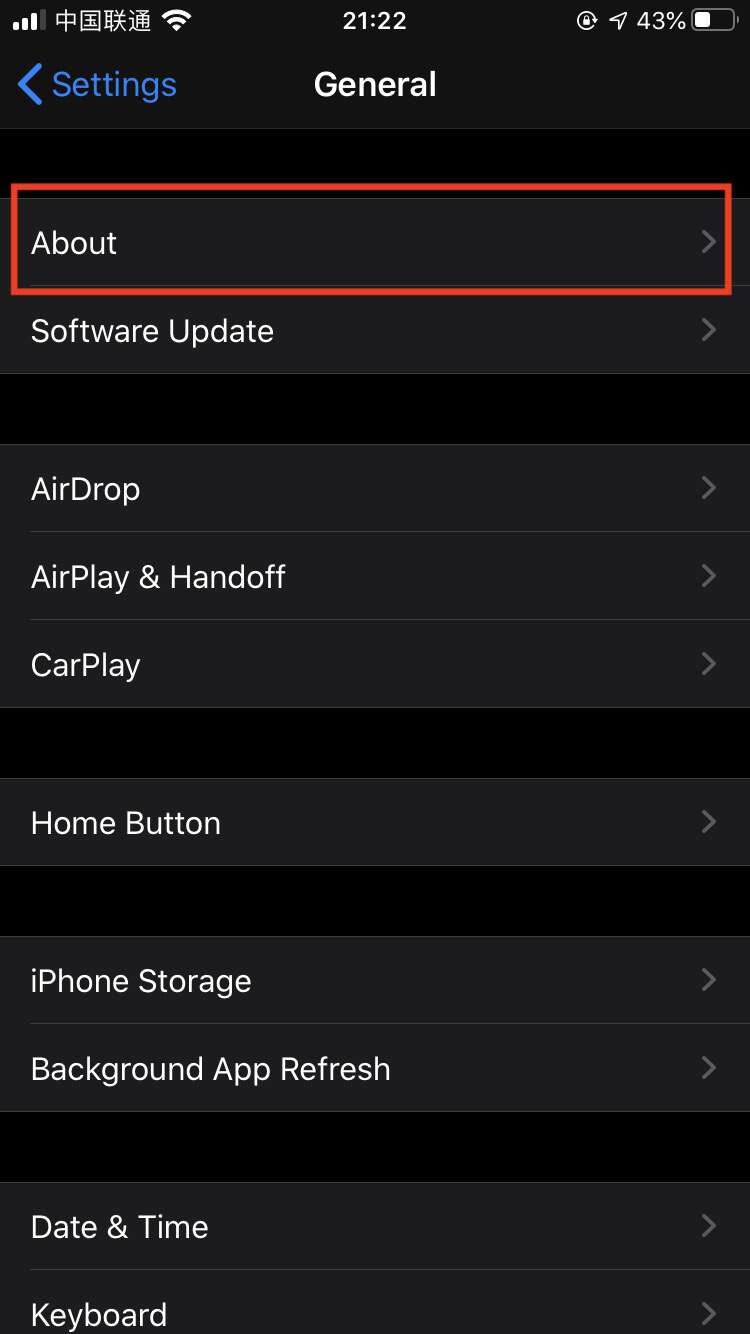
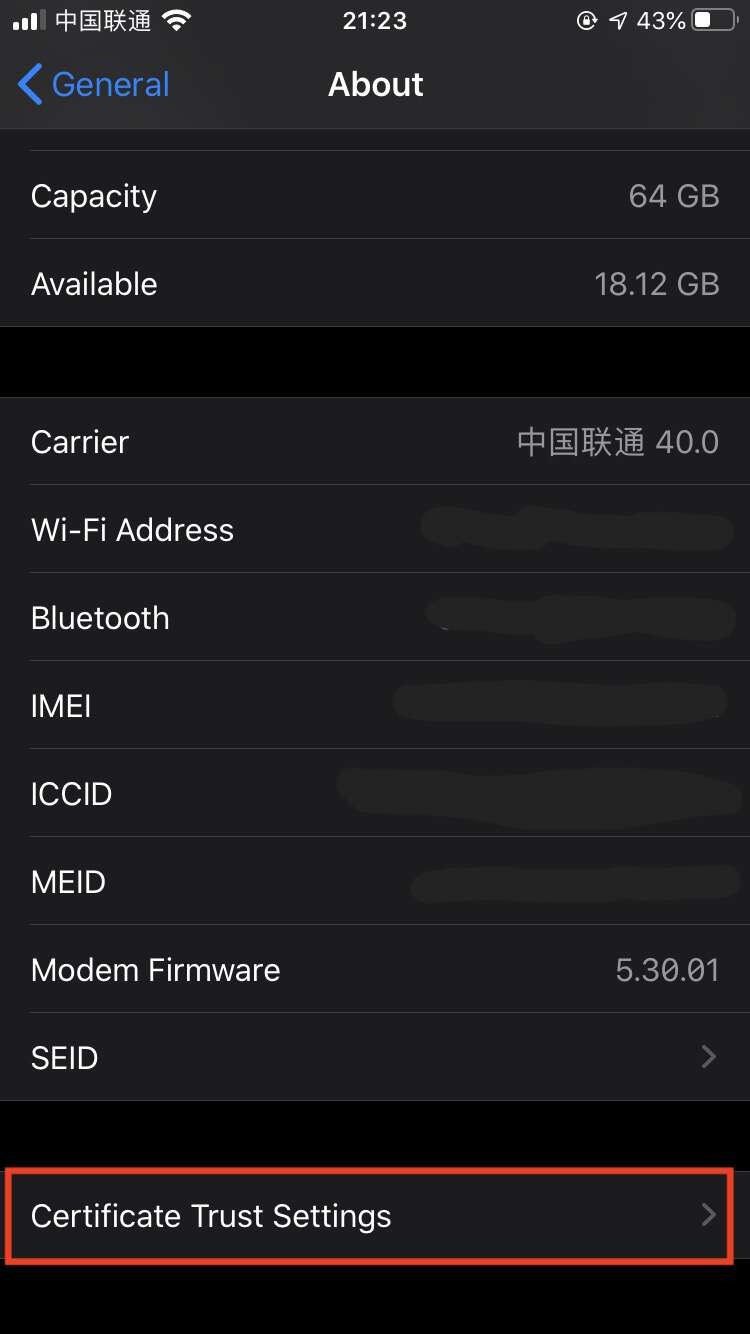
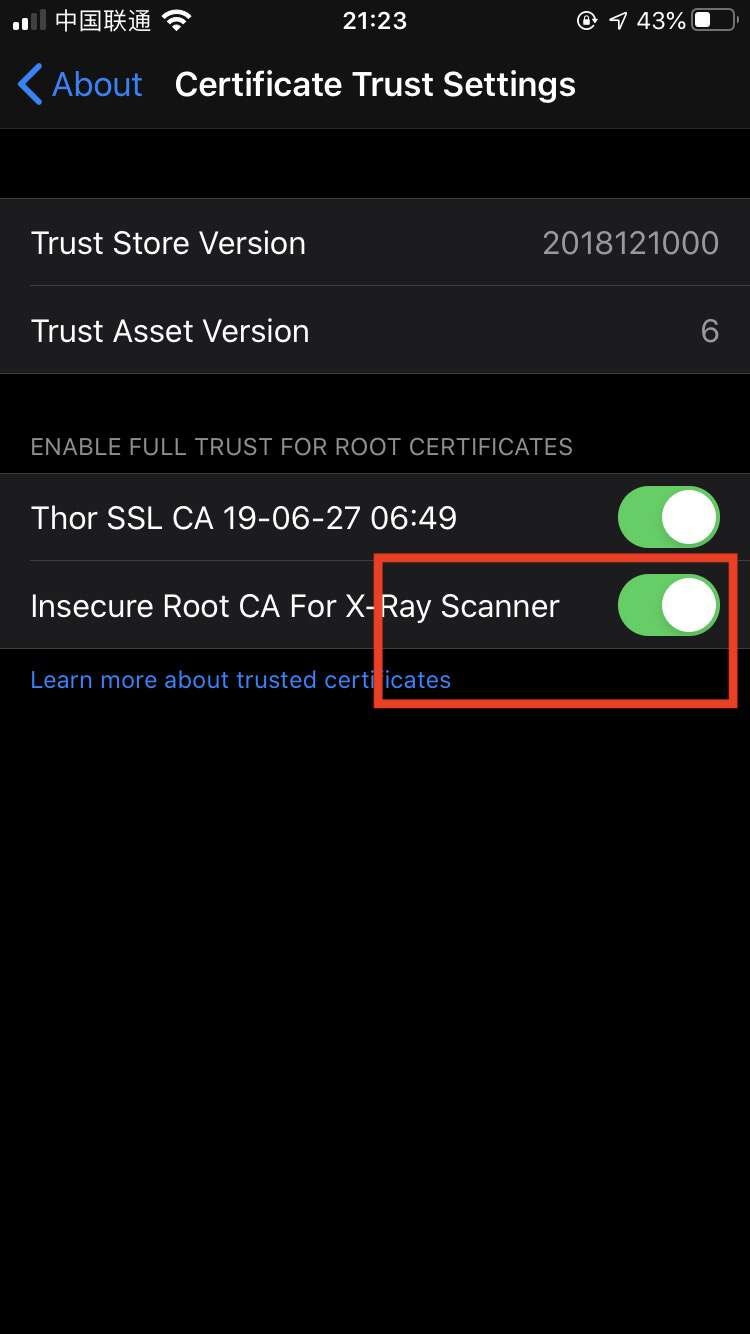
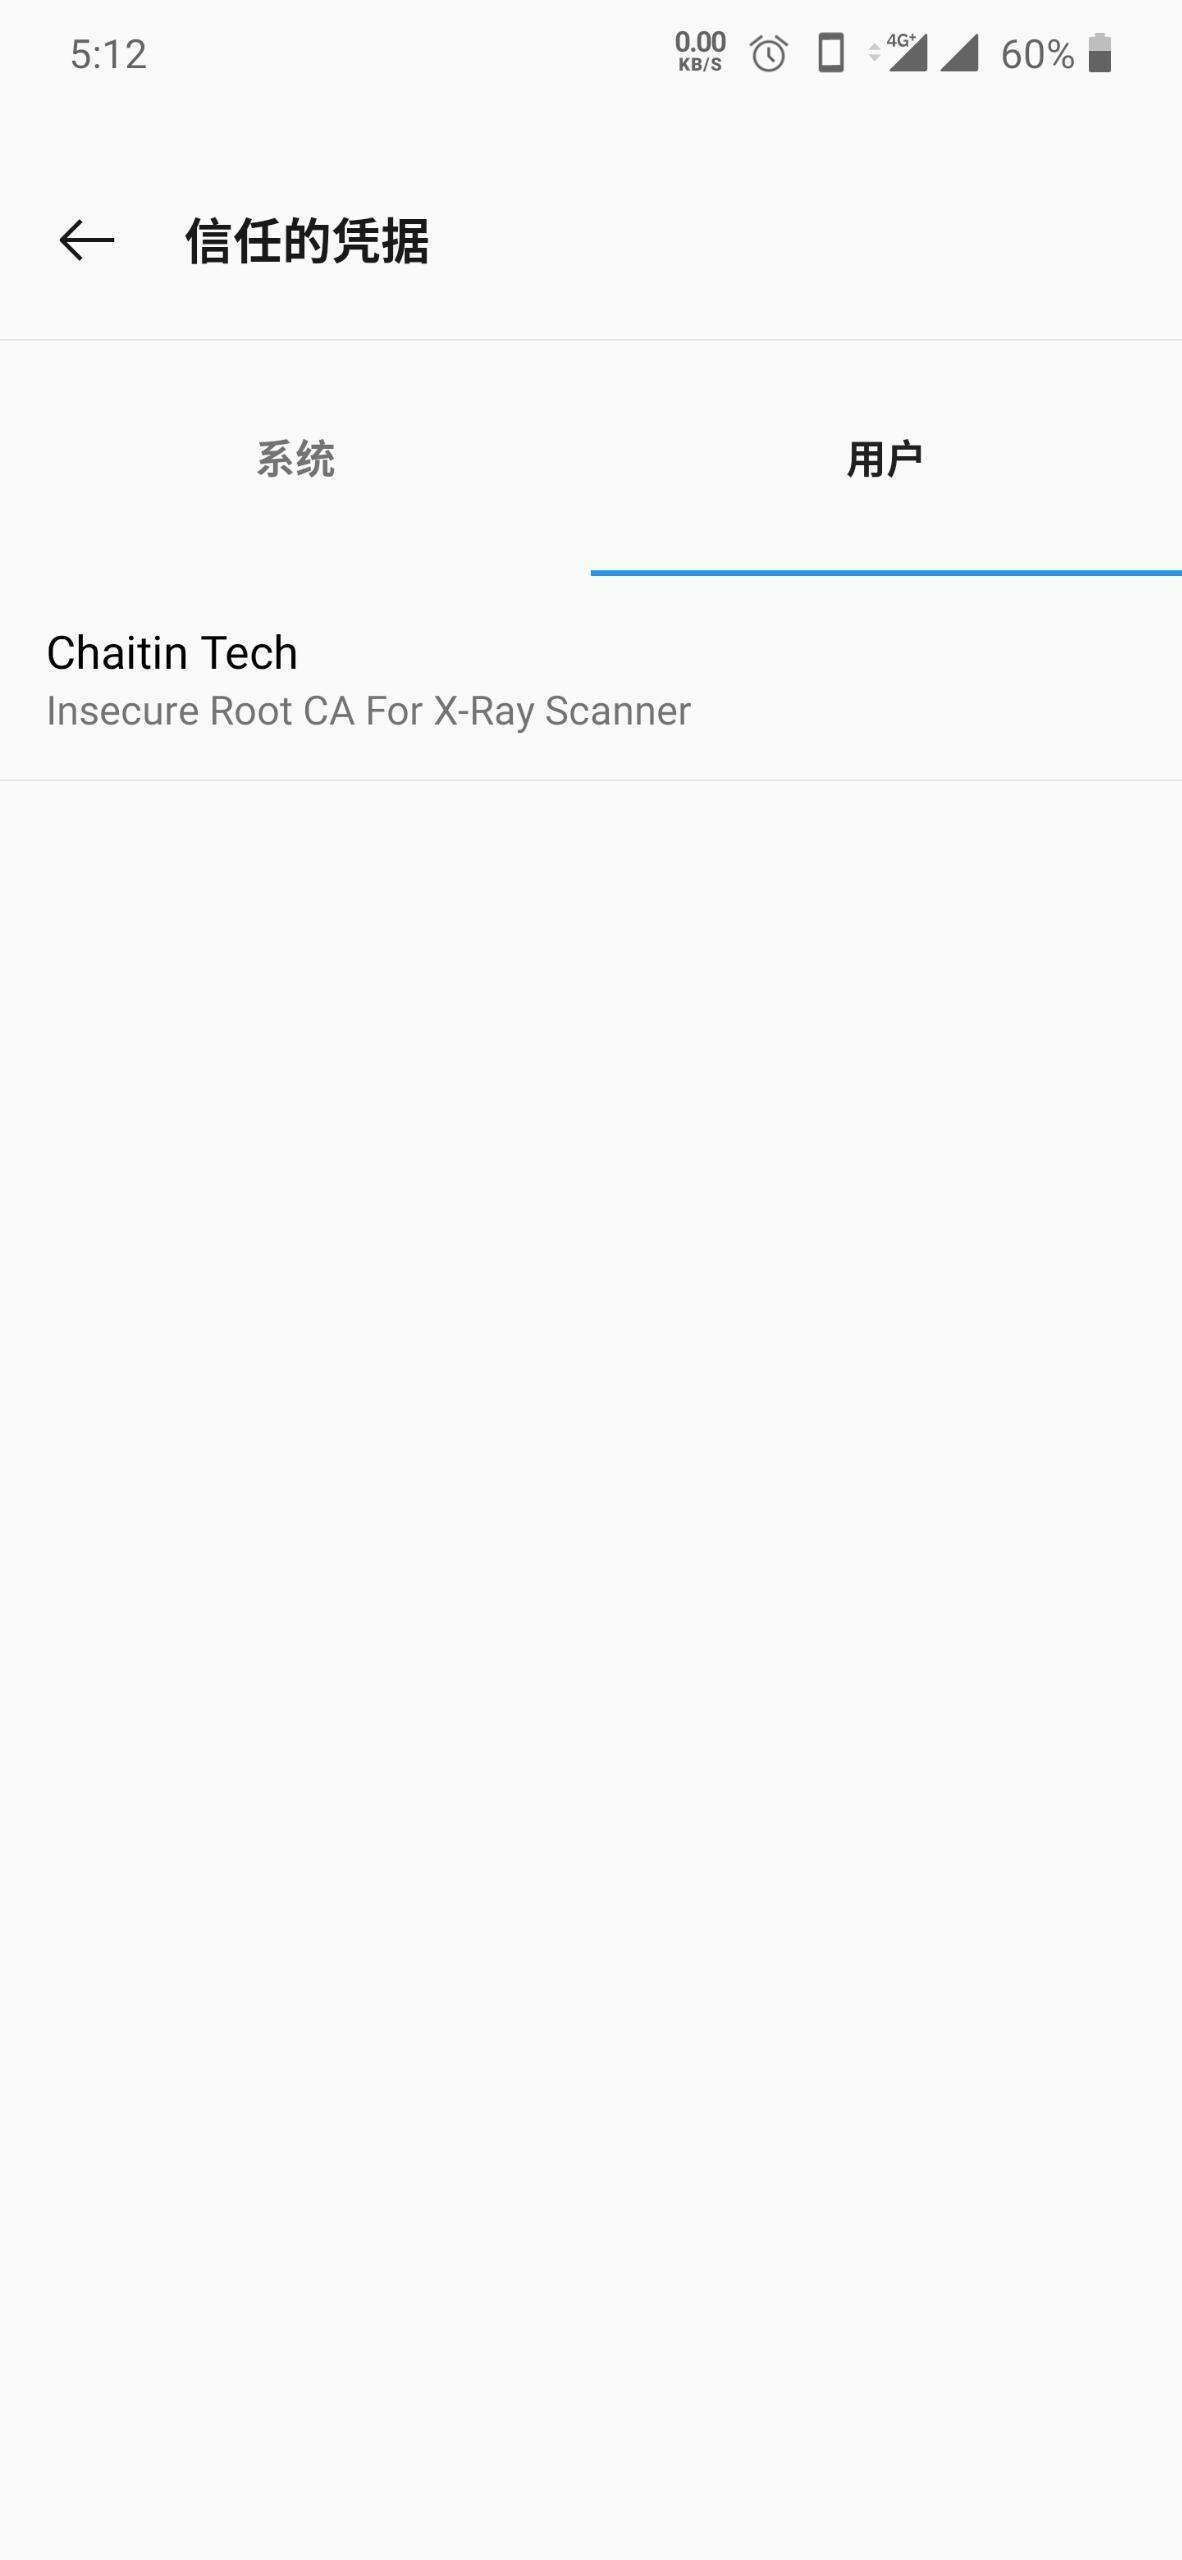
 点击通用设置-关于,在最后一项证书信任设置中,将 `Insecure Root CA For X-Ray Scanner` 一项的开关打开。
 高版本安卓(Android 7+)系统只有系统级的证书才能被信任,并且在标准情况下存放证书的`/system/etc/security/cacerts`被挂载为只读,证书安装相对困难,所以我们使用Magisk模块的方式加载证书
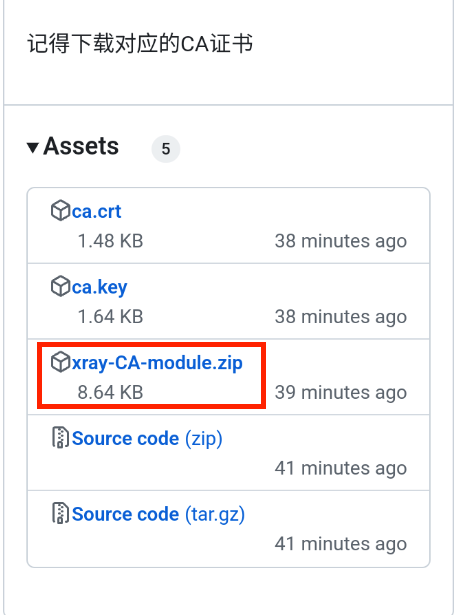
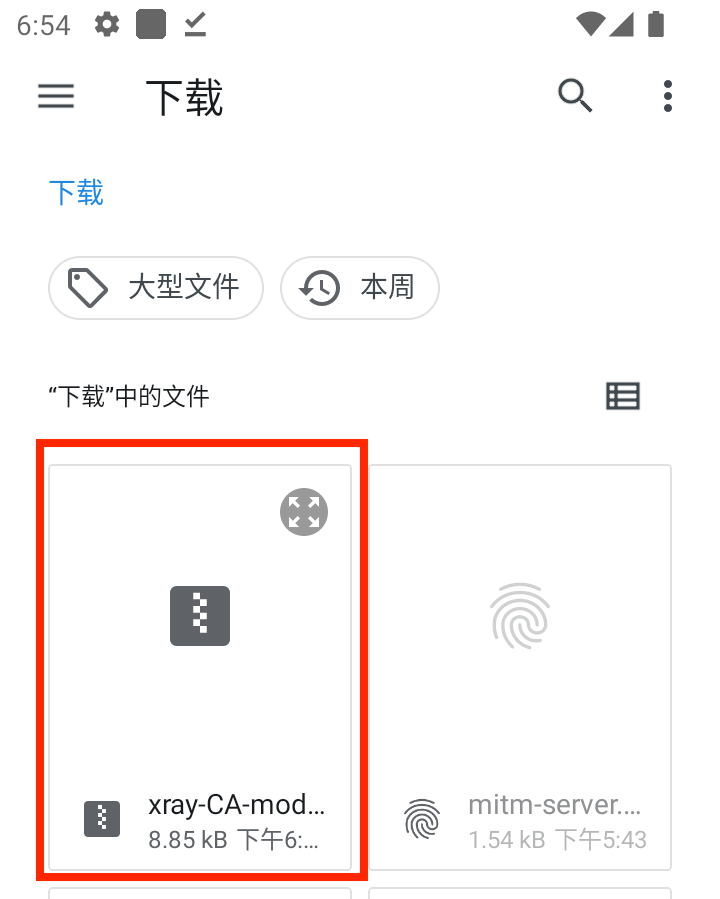
在[xray-CA-cert-module](https://github.com/Jlan45/xray-CA-cert-module/releases/tag/magisk)仓库中下载并安装对应模块,将xray本地的`ca.crt`和`ca.key`替换为release中的对应文件
在手机上下载对应的模块,并将安卓系统代理替换为xray监听设备的IP和端口
高版本安卓(Android 7+)系统只有系统级的证书才能被信任,并且在标准情况下存放证书的`/system/etc/security/cacerts`被挂载为只读,证书安装相对困难,所以我们使用Magisk模块的方式加载证书
在[xray-CA-cert-module](https://github.com/Jlan45/xray-CA-cert-module/releases/tag/magisk)仓库中下载并安装对应模块,将xray本地的`ca.crt`和`ca.key`替换为release中的对应文件
在手机上下载对应的模块,并将安卓系统代理替换为xray监听设备的IP和端口
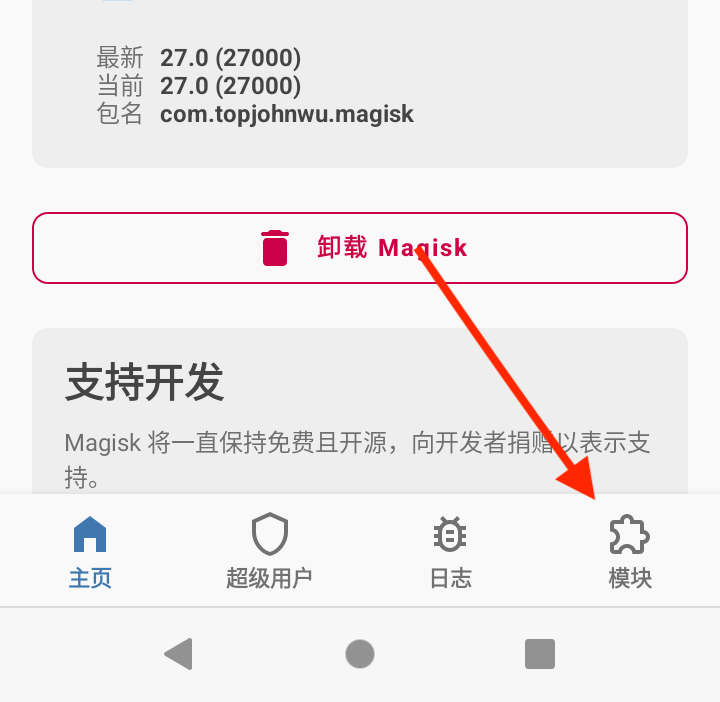
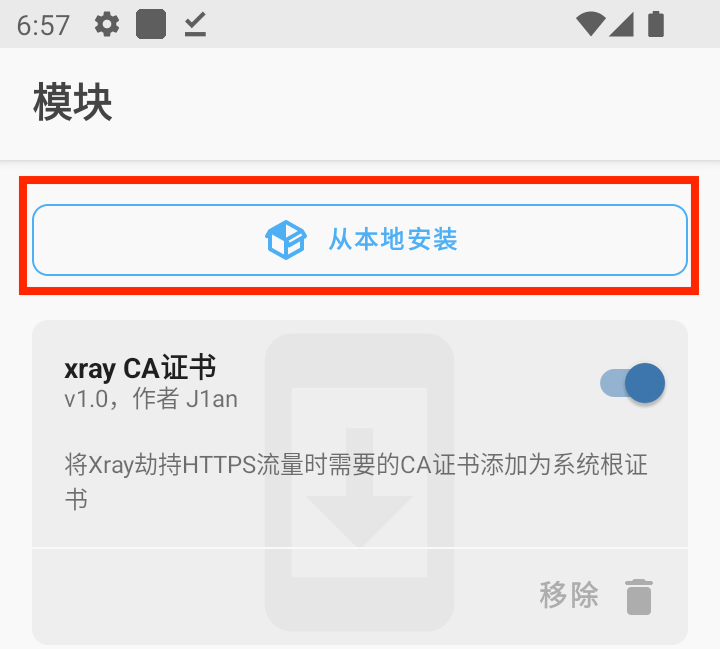
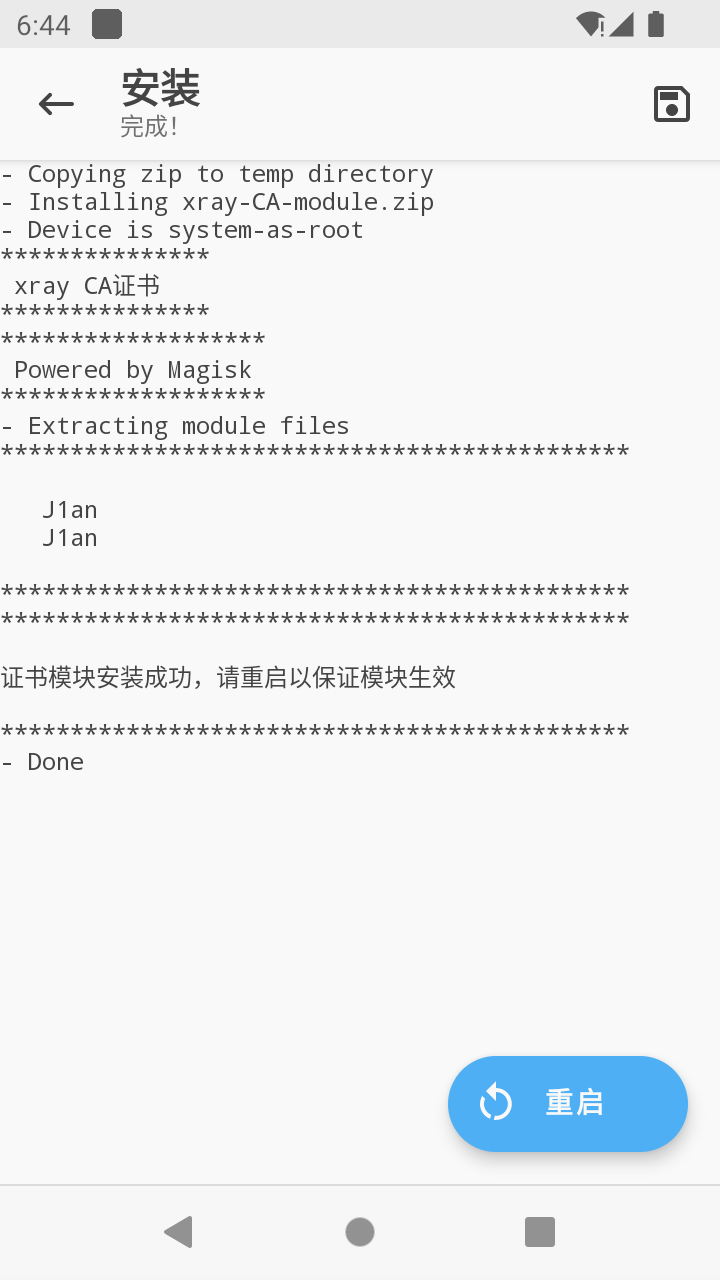
 在Magisk中安装模块
 Reboot And Enjoy \~ \~ \~
 可以将 `ca.crt` 文件传送到手机上,然后打开
或者参考下面的步骤,将手机配置代理之后,使用浏览器访问 `http://xray/` 然后点击下载 ca 证书,然后再安装。
可以将 `ca.crt` 文件传送到手机上,然后打开
或者参考下面的步骤,将手机配置代理之后,使用浏览器访问 `http://xray/` 然后点击下载 ca 证书,然后再安装。
 ### 启动代理(Enabling Agents)
在扫描之前,我们还需要做一些必要的设置
第一次启动 xray 之后,当前目录会生成 `config.yml` 文件,选择文件编辑器打开,并按照下方说明修改。
* `mitm` 中 `restriction` 中 `hostname_allowed` 增加 `testphp.vulnweb.com`
```yaml theme={null}
mitm:
...
restriction:
hostname_allowed: # 允许访问的 Hostname,支持格式如 t.com、*.t.com、1.1.1.1、1.1.1.1/24、1.1-4.1.1-8
- testphp.vulnweb.com
```
因为我们的测试目标站就是 `http://testphp.vulnweb.com`,增加这个过滤之后,xray 将只会扫描该站的流量,避免扫描到非授权目标站点。
对于配置文件中的更多解读,请参考文档中的 `配置` 章节。
* 设定漏洞扫描结果的输出,这里选择使用 html 文件输出,所以命令行后面要增加 `--html-output xray-testphp.html`。
xray 配置文件中默认不允许扫描 gov 和 edu 等网站,如果想对这些网站进行**授权测试**,需要移除 `hostname_disallowed` 的相关配置才可以。严禁未授权的测试!否则后果自负。
```bash Windows theme={null}
.\xray_windows_amd64.exe webscan --listen 127.0.0.1:7777 --html-output xray-testphp.html
```
```bash MacOS theme={null}
./xray_darwin_amd64 webscan --listen 127.0.0.1:7777 --html-output xray-testphp.html
```
```bash Linux theme={null}
./xray_linux_amd64 webscan --listen 127.0.0.1:7777 --html-output xray-testphp.html
```
常见问题
* 如何退出?`ctrl` + `c`
* 提示 `file xray-testphp.html already exists`,可以删除已经存在的报告文件,或者使用一个新的文件名,或者在文件名中加入 `__timestamp__` 或 `__datetime__` 将自动替换为实际值。
### 配置代理(Configuring Agent)
注意,下面的配置可能和上面命令的端口不一致,请按照实际情况填写
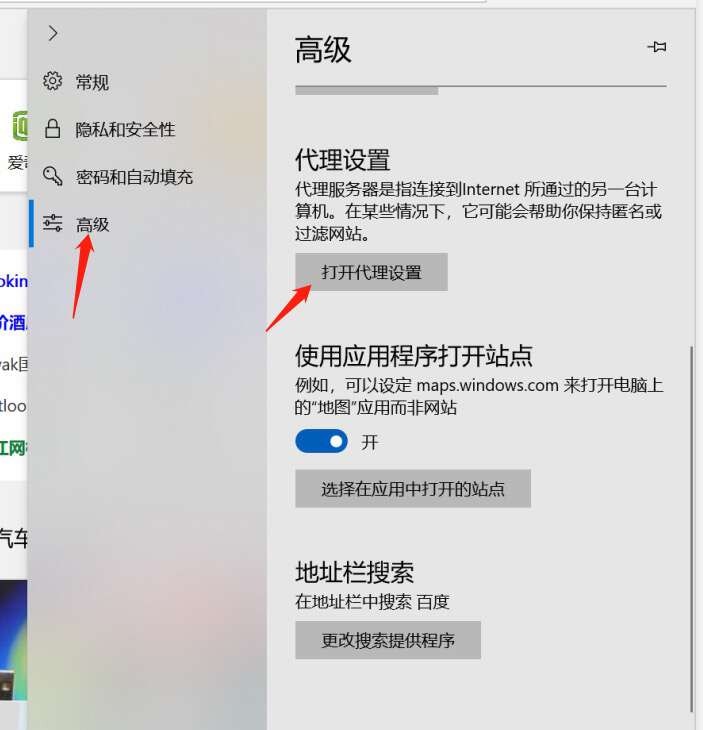
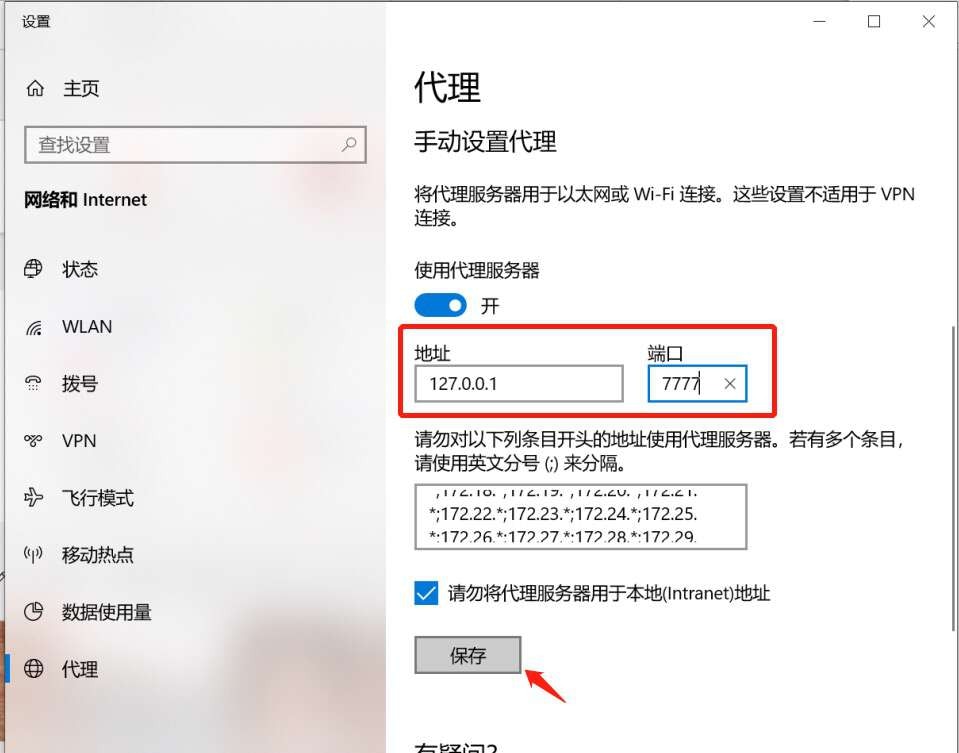
Chrome 可以使用操作系统的代理配置,同时也可以使用插件控制,这里推荐使用插件,可以更加灵活的去配置代理。
首先点击 [Chrome Store](https://chrome.google.com/webstore/detail/padekgcemlokbadohgkifijomclgjgif)
然后点击同意相关的协议和权限申请弹框,这样就可以在 Chrome 浏览器的右上角看到一个圆形图标的插件了。
新建情景模式,命名为 `xray`,然后
### 启动代理(Enabling Agents)
在扫描之前,我们还需要做一些必要的设置
第一次启动 xray 之后,当前目录会生成 `config.yml` 文件,选择文件编辑器打开,并按照下方说明修改。
* `mitm` 中 `restriction` 中 `hostname_allowed` 增加 `testphp.vulnweb.com`
```yaml theme={null}
mitm:
...
restriction:
hostname_allowed: # 允许访问的 Hostname,支持格式如 t.com、*.t.com、1.1.1.1、1.1.1.1/24、1.1-4.1.1-8
- testphp.vulnweb.com
```
因为我们的测试目标站就是 `http://testphp.vulnweb.com`,增加这个过滤之后,xray 将只会扫描该站的流量,避免扫描到非授权目标站点。
对于配置文件中的更多解读,请参考文档中的 `配置` 章节。
* 设定漏洞扫描结果的输出,这里选择使用 html 文件输出,所以命令行后面要增加 `--html-output xray-testphp.html`。
xray 配置文件中默认不允许扫描 gov 和 edu 等网站,如果想对这些网站进行**授权测试**,需要移除 `hostname_disallowed` 的相关配置才可以。严禁未授权的测试!否则后果自负。
```bash Windows theme={null}
.\xray_windows_amd64.exe webscan --listen 127.0.0.1:7777 --html-output xray-testphp.html
```
```bash MacOS theme={null}
./xray_darwin_amd64 webscan --listen 127.0.0.1:7777 --html-output xray-testphp.html
```
```bash Linux theme={null}
./xray_linux_amd64 webscan --listen 127.0.0.1:7777 --html-output xray-testphp.html
```
常见问题
* 如何退出?`ctrl` + `c`
* 提示 `file xray-testphp.html already exists`,可以删除已经存在的报告文件,或者使用一个新的文件名,或者在文件名中加入 `__timestamp__` 或 `__datetime__` 将自动替换为实际值。
### 配置代理(Configuring Agent)
注意,下面的配置可能和上面命令的端口不一致,请按照实际情况填写
Chrome 可以使用操作系统的代理配置,同时也可以使用插件控制,这里推荐使用插件,可以更加灵活的去配置代理。
首先点击 [Chrome Store](https://chrome.google.com/webstore/detail/padekgcemlokbadohgkifijomclgjgif)
然后点击同意相关的协议和权限申请弹框,这样就可以在 Chrome 浏览器的右上角看到一个圆形图标的插件了。
新建情景模式,命名为 `xray`,然后
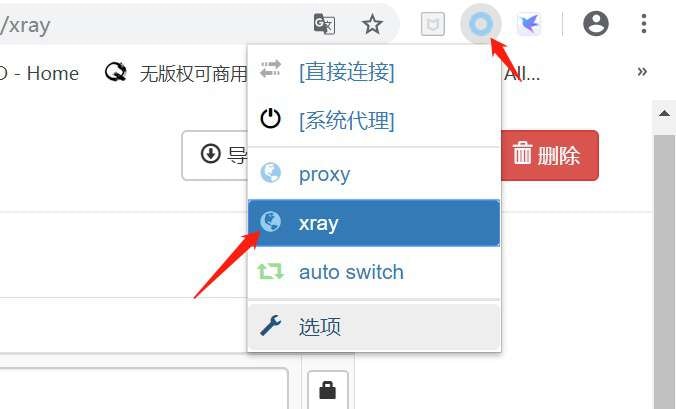
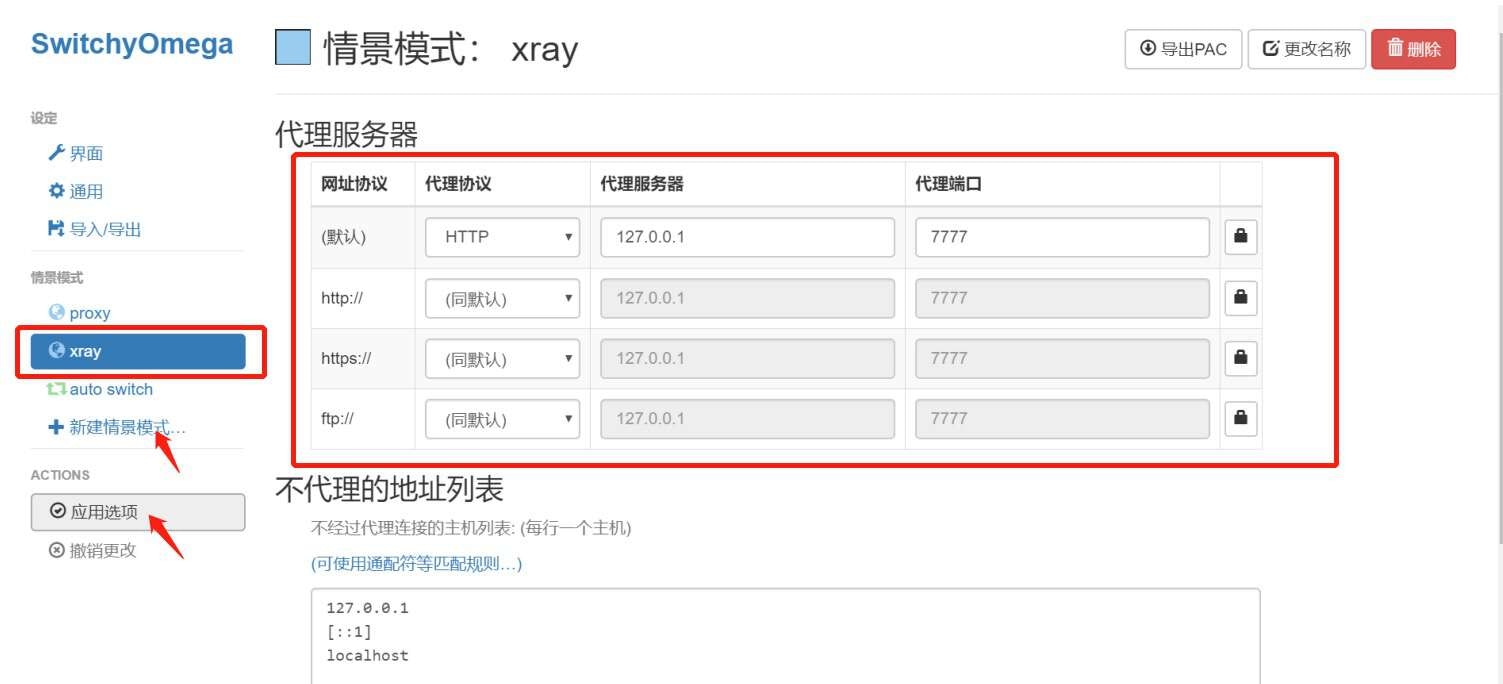 选择 `xray` 模式,这样 Chrome 就会使用 xray 作为代理了。
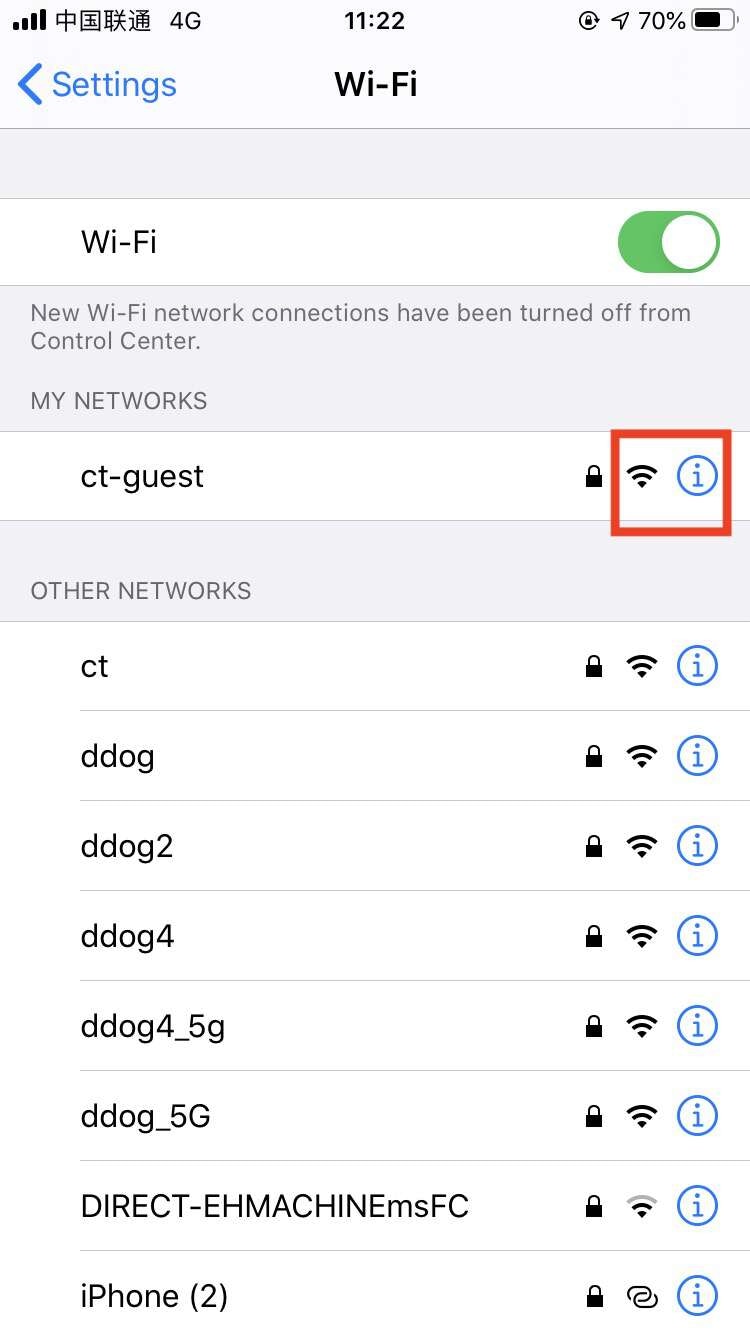
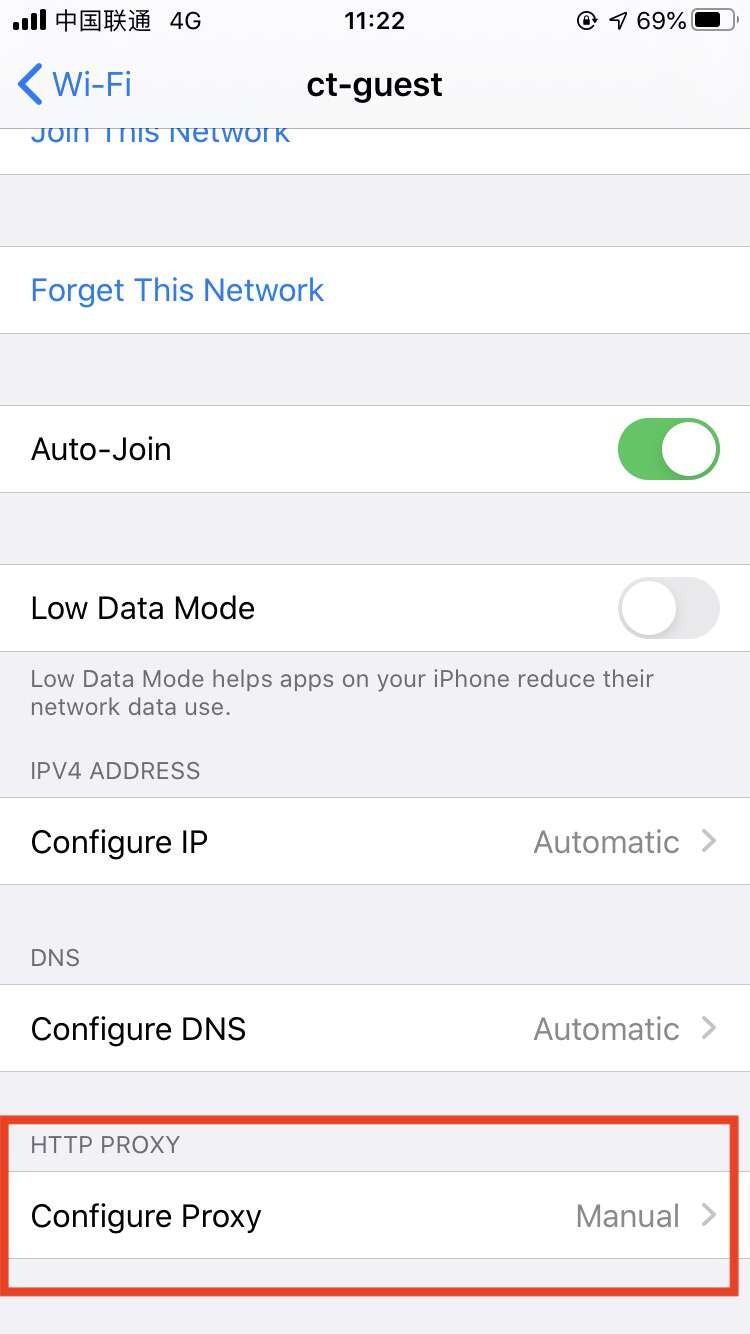
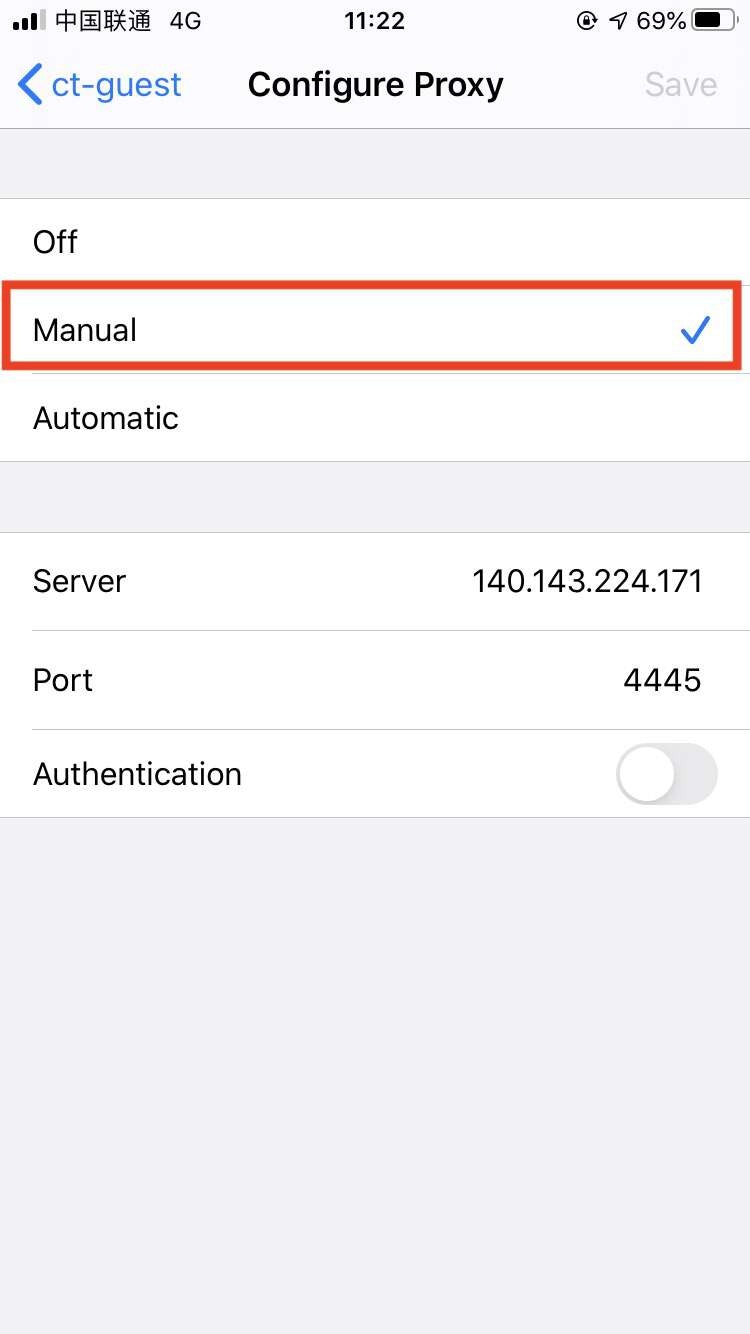
 ☝️ 按照下图的步骤操作

 按照下图的步骤操作
 ### 开始扫描(Start scanning)
使用浏览器访问 [http://testphp.vulnweb.com/](http://testphp.vulnweb.com/)
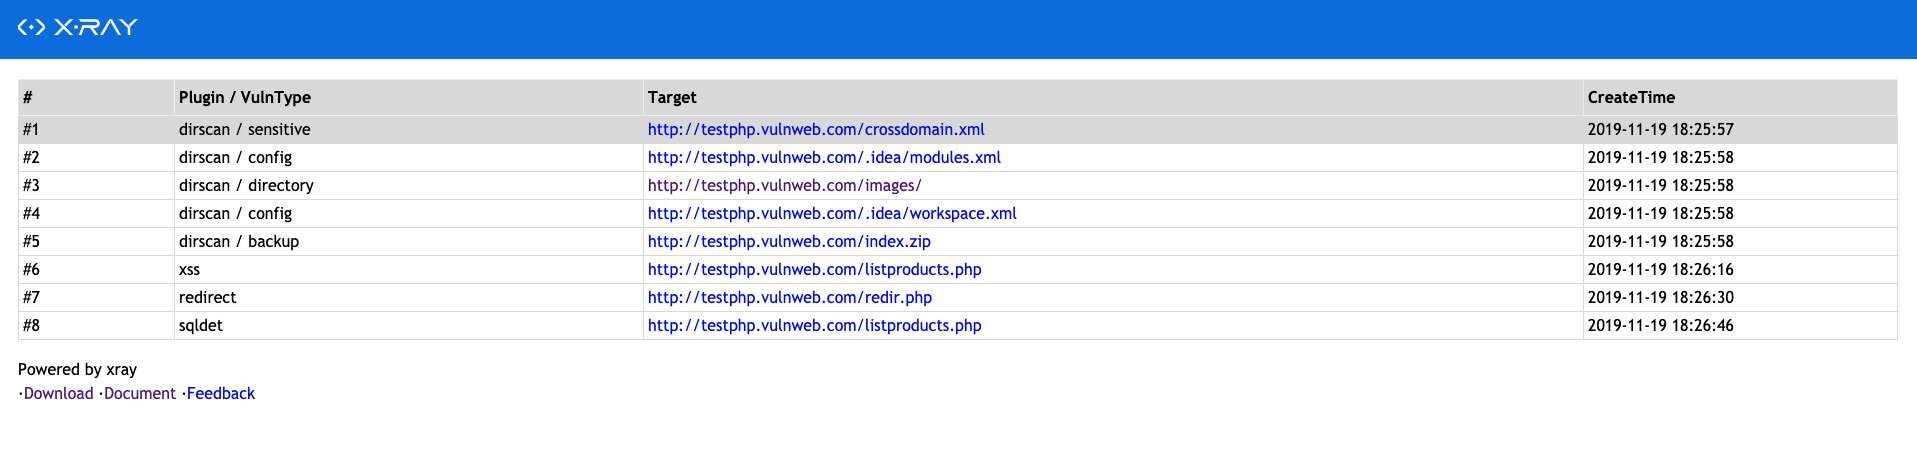
然后就可以看到 xray 界面开始输出漏洞信息,下面是几个快速链接,可以点击用于体验更多的漏洞类型的扫描
* [http://testphp.vulnweb.com/listproducts.php?cat=1](http://testphp.vulnweb.com/listproducts.php?cat=1)
* [http://testphp.vulnweb.com/artists.php?artist=2](http://testphp.vulnweb.com/artists.php?artist=2)
* [http://testphp.vulnweb.com/redir.php?r=http://www.w3.org](http://testphp.vulnweb.com/redir.php?r=http://www.w3.org)
### 开始扫描(Start scanning)
使用浏览器访问 [http://testphp.vulnweb.com/](http://testphp.vulnweb.com/)
然后就可以看到 xray 界面开始输出漏洞信息,下面是几个快速链接,可以点击用于体验更多的漏洞类型的扫描
* [http://testphp.vulnweb.com/listproducts.php?cat=1](http://testphp.vulnweb.com/listproducts.php?cat=1)
* [http://testphp.vulnweb.com/artists.php?artist=2](http://testphp.vulnweb.com/artists.php?artist=2)
* [http://testphp.vulnweb.com/redir.php?r=http://www.w3.org](http://testphp.vulnweb.com/redir.php?r=http://www.w3.org)
 ## 主动扫描(active scanning)
爬虫模式是模拟人工去点击网页的链接,然后去分析扫描,和代理模式不同的是,爬虫不需要人工的介入,访问速度要快很多,但是也有一些缺点需要注意
* xray 的基础爬虫不能处理 js 渲染的页面,如果需要此功能,请参考 [版本对比](/generic/compare)
### 启动爬虫(Start crawler)
```cmd Windows theme={null}
xray_windows_amd64.exe webscan --basic-crawler http://testphp.vulnweb.com/ --html-output xray-crawler-testphp.html
```
```bash MacOS theme={null}
./xray_darwin_amd64 webscan --basic-crawler http://testphp.vulnweb.com/ --html-output xray-crawler-testphp.html
```
```bash Linux theme={null}
./xray_linux_amd64 webscan --basic-crawler http://testphp.vulnweb.com/ --html-output xray-crawler-testphp.html
```
### 登录后的网站扫描(Scanning website after login)
如果用的是代理模式,只要浏览器是登录状态,那么漏洞扫描收到的请求也都是登录状态的请求。但对于普通爬虫而言,就没有这么“自动化”了,
但是可以通过配置 Cookie 的方式实现登录后的扫描。
打开配置文件,修改 `http` 配置部分的 `Headers` 项:
```yaml theme={null}
http:
headers:
Cookie: key=value
```
上述配置将为所有请求(包括爬虫和漏洞扫描)增加一条 Cookie `key=value`
## 服务扫描(Service scanning)
xray 中最常见的是 web 扫描,但是 xray 将会逐渐开放服务扫描的相关能力,目前主要是服务扫描相关的 poc。老版本升级的用户请注意配置文件需要加入服务扫描的相关 poc 名字,目前只有一个 tomcat-cve-2020-1938 ajp 协议任意文件检测 poc。
参数配置目前比较简单,输入支持两种方式,例如:
### 快速检测单个目标(Quickly detect a single goal)
```bash theme={null}
./xray servicescan --target 127.0.0.1:8009
```
### 批量检查目标(Batch inspection goals)
一行一个目标,带端口
```bash theme={null}
./xray servicescan --target-file 1.file
```
其中 1.file 的格式为一个行一个 service,如
```
10.3.0.203:8009
127.0.0.1:8009
```
### 结果输出(Result output)
将检测结果输出到 html 报告中
```bash theme={null}
./xray servicescan --target 127.0.0.1:8009 --html-output service.html
./xray servicescan --target-file 1.file --html-output service.html
```
将检测结果输出到 json 文件中
```bash theme={null}
./xray servicescan --target 127.0.0.1:8099 --json-output 1.json
```
```bash theme={null}
NAME:
servicescan - Run a service scan task
USAGE:
servicescan [command options] [arguments...]
OPTIONS:
--target value specify the target, for example: host:8009
--target-file value load targets from a local file, one target a line
--json-output FILE output xray results to FILE in json format
--html-output FILE output xray result to `FILE` in HTML format
```
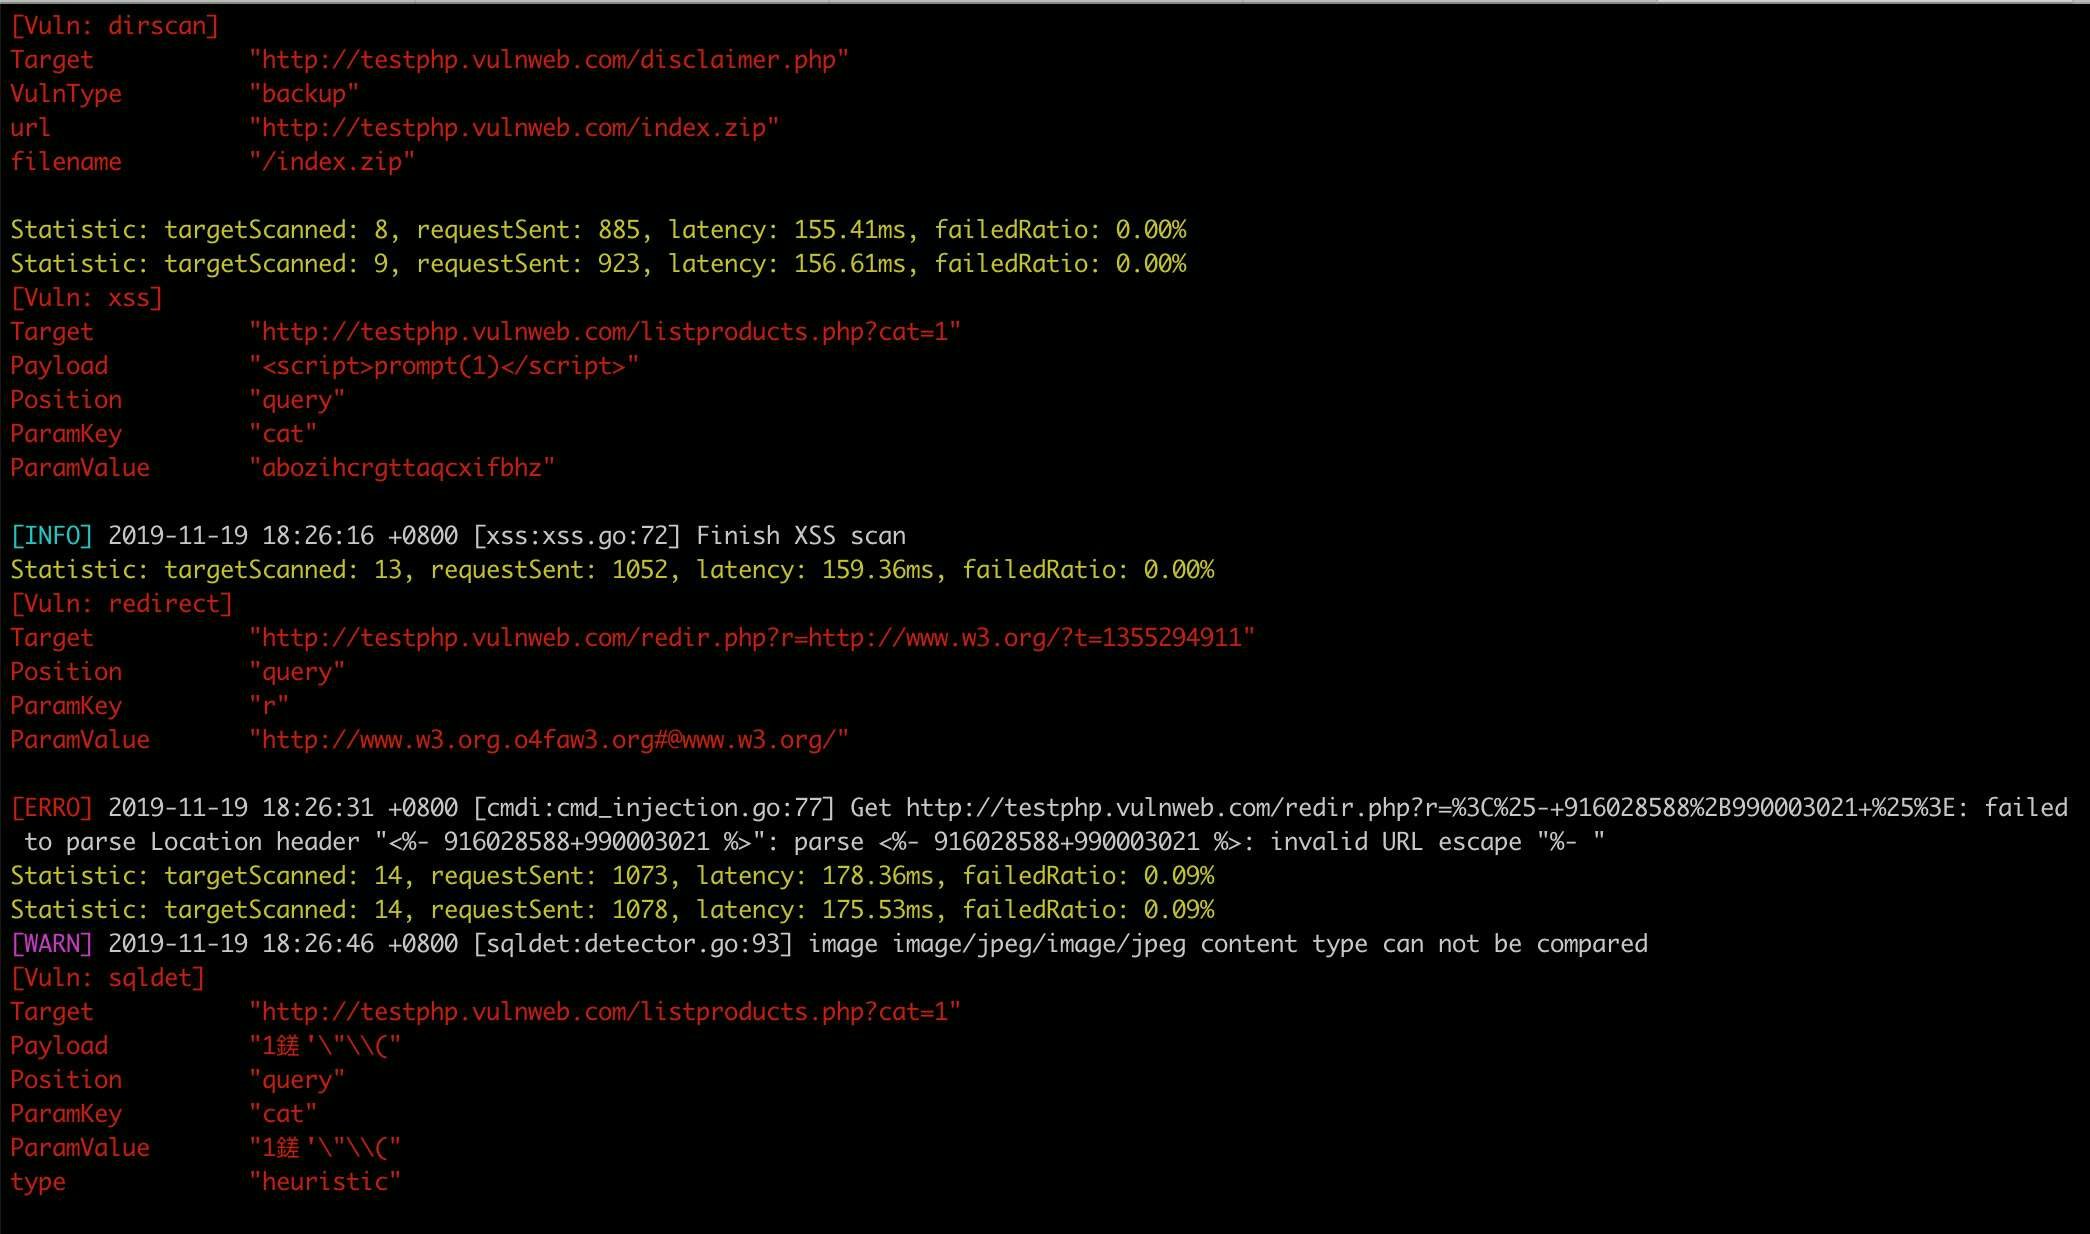
以 tomcat CVE-2020-1938 ajp 协议任意文件读取为例,命令行如下图。
## 主动扫描(active scanning)
爬虫模式是模拟人工去点击网页的链接,然后去分析扫描,和代理模式不同的是,爬虫不需要人工的介入,访问速度要快很多,但是也有一些缺点需要注意
* xray 的基础爬虫不能处理 js 渲染的页面,如果需要此功能,请参考 [版本对比](/generic/compare)
### 启动爬虫(Start crawler)
```cmd Windows theme={null}
xray_windows_amd64.exe webscan --basic-crawler http://testphp.vulnweb.com/ --html-output xray-crawler-testphp.html
```
```bash MacOS theme={null}
./xray_darwin_amd64 webscan --basic-crawler http://testphp.vulnweb.com/ --html-output xray-crawler-testphp.html
```
```bash Linux theme={null}
./xray_linux_amd64 webscan --basic-crawler http://testphp.vulnweb.com/ --html-output xray-crawler-testphp.html
```
### 登录后的网站扫描(Scanning website after login)
如果用的是代理模式,只要浏览器是登录状态,那么漏洞扫描收到的请求也都是登录状态的请求。但对于普通爬虫而言,就没有这么“自动化”了,
但是可以通过配置 Cookie 的方式实现登录后的扫描。
打开配置文件,修改 `http` 配置部分的 `Headers` 项:
```yaml theme={null}
http:
headers:
Cookie: key=value
```
上述配置将为所有请求(包括爬虫和漏洞扫描)增加一条 Cookie `key=value`
## 服务扫描(Service scanning)
xray 中最常见的是 web 扫描,但是 xray 将会逐渐开放服务扫描的相关能力,目前主要是服务扫描相关的 poc。老版本升级的用户请注意配置文件需要加入服务扫描的相关 poc 名字,目前只有一个 tomcat-cve-2020-1938 ajp 协议任意文件检测 poc。
参数配置目前比较简单,输入支持两种方式,例如:
### 快速检测单个目标(Quickly detect a single goal)
```bash theme={null}
./xray servicescan --target 127.0.0.1:8009
```
### 批量检查目标(Batch inspection goals)
一行一个目标,带端口
```bash theme={null}
./xray servicescan --target-file 1.file
```
其中 1.file 的格式为一个行一个 service,如
```
10.3.0.203:8009
127.0.0.1:8009
```
### 结果输出(Result output)
将检测结果输出到 html 报告中
```bash theme={null}
./xray servicescan --target 127.0.0.1:8009 --html-output service.html
./xray servicescan --target-file 1.file --html-output service.html
```
将检测结果输出到 json 文件中
```bash theme={null}
./xray servicescan --target 127.0.0.1:8099 --json-output 1.json
```
```bash theme={null}
NAME:
servicescan - Run a service scan task
USAGE:
servicescan [command options] [arguments...]
OPTIONS:
--target value specify the target, for example: host:8009
--target-file value load targets from a local file, one target a line
--json-output FILE output xray results to FILE in json format
--html-output FILE output xray result to `FILE` in HTML format
```
以 tomcat CVE-2020-1938 ajp 协议任意文件读取为例,命令行如下图。
